
DECEMBER 19th, 2015
This is a copy of the Making Of from 2014-2015, initially written on the Adventure Gamers forums, and updated on the TIG forums.
Many thanks to Roger RKT for proofreading the main parts of this text.
This is a copy of the Making Of from 2014-2015, initially written on the Adventure Gamers forums, and updated on the TIG forums.
Many thanks to Roger RKT for proofreading the main parts of this text.
Introduction
Please learn more about the game first if you never heard of it before.
Catyph takes you to the Catyph planetary system (Catyph is a planet within the Solar System of Bohsonca, which is the system where your home world Terra is located). More specifically, you visit one of the numerous moons of Catyph, called Tytaah. As you will see, there’s a significant environment developed for this scifi adventure, with strange names and many things to discover.
You start in a desert region called Kynan, where you arrive alone and a little lost. Kynan is not the perfect place to go for holidays: the incessant ammonia rains are slowly eroding the few low mountains, making this continent looking like a plain of red sand.
Fortunately, Tytaah is not completely desert and you quickly discover signs of life. After a few minutes of fun with the first puzzles, you enter a mysterious Geodesic Dome where you will meet an indigenous (or not!) being called Germinal. He’s somehow the effective god of Tytaah, the creator of everything, and he asks you to initiate the Kunci, an unknown mechanism of his making. Unfortunately, he thinks that you’re not ready or capable, so you have to pass a series of tests in different regions of this world, to prove that you’re the one for the task. Then it’s up to you to discover the truth and to decide in the end if you want, or not, to trust Germinal and use his Kunci thing.
The gameplay of Catyph is basically the same as in my previous game ASA: A Space Adventure, but there are many things I wanted to improve. First of all, Catyph will run in HD, which has been made possible by the use of another engine: Visionaire Studio (note: ASA was initially developed with Adventure Maker). The good news is that this software is now in version 4.x, and contains significant improvements.
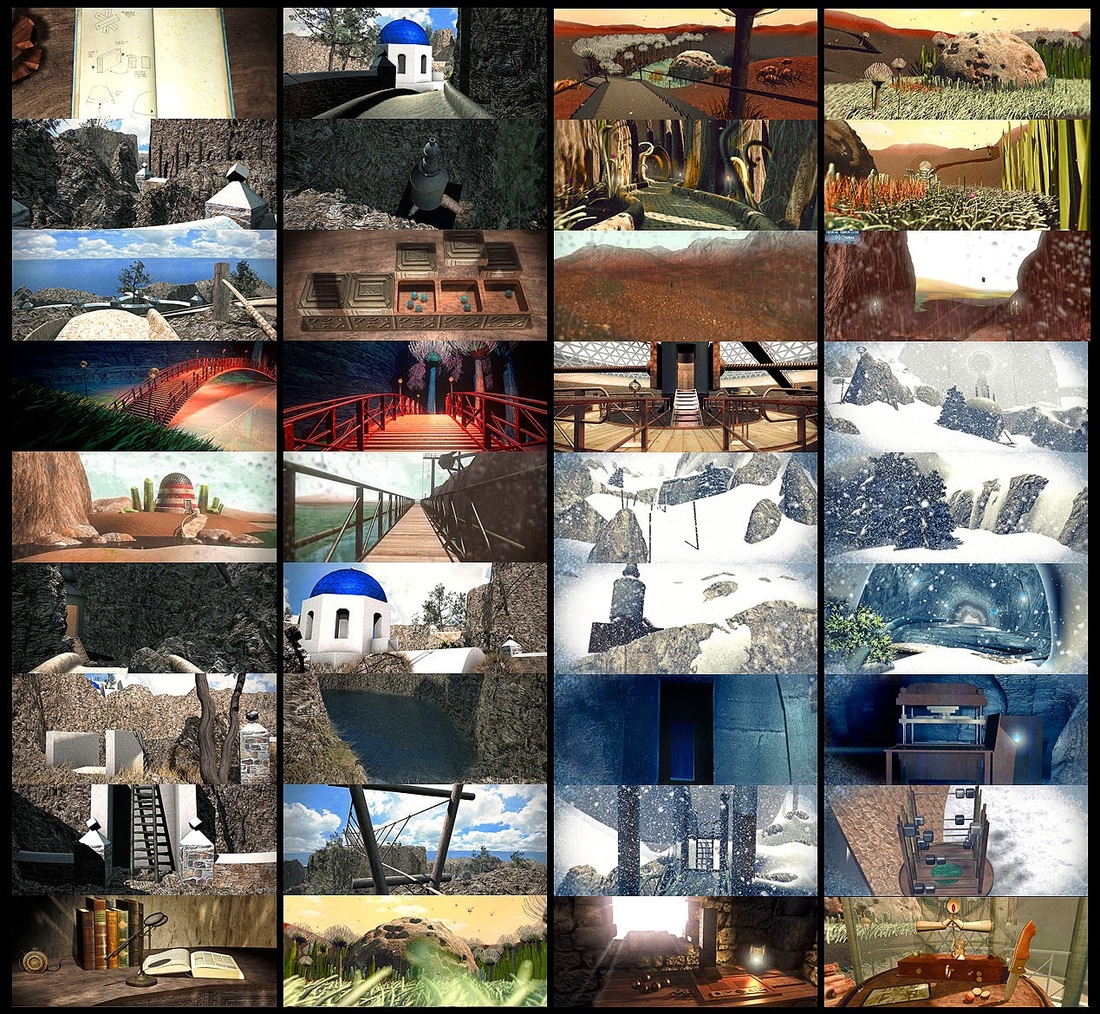
HD is not the only thing you should be aware of. Catyph will also feature video transitions between sections (that you can disable anytime in a single click), several difficulty levels and an immersive story. Several characters will talk to you to help the game to progress. Last, but not least, the diary from ASA has been replaced by a datalog, which contains everything you need to know and learn during the game.
In the following parts, I will do my best to describe how I worked on this project, with my own tools (3dsmax, After Effects), at home. Everything below was more or less written "on live" while I was developing Catyph, so it might not always be complete or acurate, but I think that it is good enough to explain the process.
Simon Mesnard
Catyph takes you to the Catyph planetary system (Catyph is a planet within the Solar System of Bohsonca, which is the system where your home world Terra is located). More specifically, you visit one of the numerous moons of Catyph, called Tytaah. As you will see, there’s a significant environment developed for this scifi adventure, with strange names and many things to discover.
You start in a desert region called Kynan, where you arrive alone and a little lost. Kynan is not the perfect place to go for holidays: the incessant ammonia rains are slowly eroding the few low mountains, making this continent looking like a plain of red sand.
Fortunately, Tytaah is not completely desert and you quickly discover signs of life. After a few minutes of fun with the first puzzles, you enter a mysterious Geodesic Dome where you will meet an indigenous (or not!) being called Germinal. He’s somehow the effective god of Tytaah, the creator of everything, and he asks you to initiate the Kunci, an unknown mechanism of his making. Unfortunately, he thinks that you’re not ready or capable, so you have to pass a series of tests in different regions of this world, to prove that you’re the one for the task. Then it’s up to you to discover the truth and to decide in the end if you want, or not, to trust Germinal and use his Kunci thing.
The gameplay of Catyph is basically the same as in my previous game ASA: A Space Adventure, but there are many things I wanted to improve. First of all, Catyph will run in HD, which has been made possible by the use of another engine: Visionaire Studio (note: ASA was initially developed with Adventure Maker). The good news is that this software is now in version 4.x, and contains significant improvements.
HD is not the only thing you should be aware of. Catyph will also feature video transitions between sections (that you can disable anytime in a single click), several difficulty levels and an immersive story. Several characters will talk to you to help the game to progress. Last, but not least, the diary from ASA has been replaced by a datalog, which contains everything you need to know and learn during the game.
In the following parts, I will do my best to describe how I worked on this project, with my own tools (3dsmax, After Effects), at home. Everything below was more or less written "on live" while I was developing Catyph, so it might not always be complete or acurate, but I think that it is good enough to explain the process.
Simon Mesnard
Stages
Like every game, Catyph goes through various stages before release. I went through 4 main stages that I named as follows:
- pre-production
- production
- post-production
- release
These terms, particularly ‘post-production’ are more common to film-making. It's because I'm not originally versed in game development (I used to create animated short films before). I wanted to keep a cinematographic touch in the development of Catyph. This is how I understand it:
Pre-Production
The pre-production process is the stage where you begin to think of the whole project, gather ideas, put them in the right order, and make illustrations. In the case of Catyph, most of this happened during the creation of the short film. It includes the design of the hero, the ideas about the world (planets Terra, Catyph), and the storyline (Blue Matter, landing on Tytaah).
The ideas, and the main puzzles, are just rough drawings on a sheet of paper and not really interesting as such. Most of the time, the ideas stay in my head, and I just draw the main shapes so I don’t forget what I wish to do.
Production
What I call Production should probably be called Development. It is the process where the whole game is physically created, and it is usually the most difficult step (at least when you work on your own).
The Production, in the case of such a pre-rendered 3D project, includes:
Steps 1 to 7 will be explained one by one in the next chapters.
Production
What I call Production should probably be called Development. It is the process where the whole game is physically created, and it is usually the most difficult step (at least when you work on your own).
The Production, in the case of such a pre-rendered 3D project, includes:
- modeling, texturing, rigging of the characters
- modeling, texturing, lighting of the environments
- animation, cameras position
- rendering
- compositing, editing
- export to game engine
- code, development, puzzle scripting
Steps 1 to 7 will be explained one by one in the next chapters.
Post-Production
I’m not certain what to name the Post-Production stage as in my case. The main idea is that I check the whole game that I made during the Production process, and decide on any improvements I should make. But Post-Production is much more than just fixing bugs and adding more features. It’s also an important part where I work on localization, text proofing, audio. In fact everything that is not related to Graphics or Production can come in here.
- datalog completion
- text proofing
- localization
- additional menus and systems
- bonus games and puzzles
- music composition
- sound effects
- voices
- visual effects
- beta-testing
- bugs fixing
...
Release
Release is an important stage because it changes the way people perceive the game and decide whether or not to buy it (obviously). There are many reasons to prepare for this stage very early on in the process of making the game. In fact, it should be prepared as soon as possible, during the very early development of the game, because spreading the word about the project, and convincing people of its quality can prove very, very difficult.
Since the game is not finished when I'm writing these lines, all I can share is ideas and projections, so I will make this part as short as possible. However I will try to write a Post Mortem sooner or later to describe what happened after the release of the game.
Pre-Production
Ideas
Everything in a multimedia project usually begins with finding ideas and writing them. That was the purpose of the short film Catyph: starting a new part of the Terran History (after ASA). Thus I wrote several documents and made a few rough illustrations and began working on the animation. So many months/years after the release of this film on Vimeo, it is now a bit difficult to explain exactly how it was created, and I have not kept any interesting document from this period. As a result it is difficult for me to explain in details the pre-production process of the game (which is based on the film's). However I can, at least, explain my main choices.
Everything in a multimedia project usually begins with finding ideas and writing them. That was the purpose of the short film Catyph: starting a new part of the Terran History (after ASA). Thus I wrote several documents and made a few rough illustrations and began working on the animation. So many months/years after the release of this film on Vimeo, it is now a bit difficult to explain exactly how it was created, and I have not kept any interesting document from this period. As a result it is difficult for me to explain in details the pre-production process of the game (which is based on the film's). However I can, at least, explain my main choices.
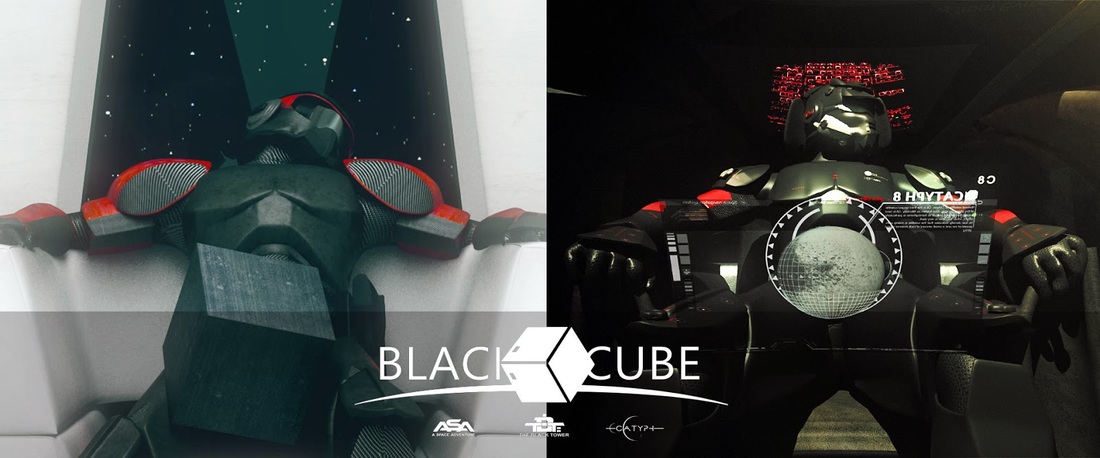
As you probably know, Catyph and ASA are part of the same series that I named The Black Cube. You can best summarize the Black Cube series as: "The discovery of mysterious Cubes, at different times and in different places, by different heroes". It gives a vast universe to develop...
- ASA takes place in 2057 aboard the ARK, a mysterious spaceship.
- Catyph takes place in 2062 on the moon Tytaah.
There’s only 5 years between the events of the 2 games, and as a result the technology of the Terrans has not evolved that much. The main evolution is the development of a new power that they called the Blue Matter. It is, therefore, logical that the spacesuit of the hero of Catyph is a simple update (in terms of design) from the one in ASA.
Some of you could ask why we never see the face of the hero. This is done on purpose, because the hero can be anyone. Catyph is a 1st person game like Myst where you see through the eyes of the hero. The hero is You. You are in the spacesuit, taking decisions, exploring the strange regions of Tytaah and more.
Character Design
There are so many possible designs of sci-fi spacesuits! I tried to create my own design, even if yes, I found inspiration here and there… because, honestly, I’m not a character designer. Here's the final design of the hero of Catyph, as he appears in the short film:

Some people have compared the spacesuit of CATYPH with the N7 model from the Mass Effect series (which made me happy of course). It is true that I enjoyed Mass Effect and that the suits from this series have an incredible design, it would also be a lie to say that I didn’t get any inspiration from there: the black and red colors from the N7 suit work perfectly on the hero, and I liked it. However, as you can see in your favorite search engine, there are many (many!) possible sources of inspiration when it is question of sci-fi related designs. The spacesuit in CATYPH is a simple update of the one in my previous game ASA: A Space Adventure.
This is how the model of ASA was initially created:
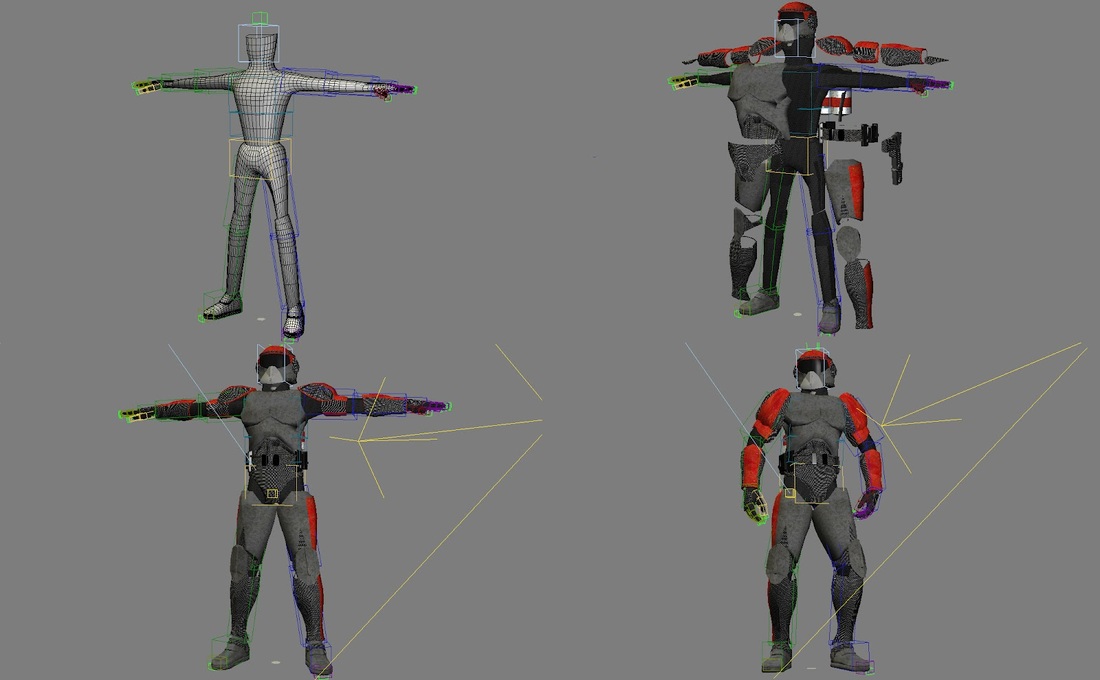
Now if you look closely at this picture, you will see that, except for the helmet and the main colors, the design is basically the same :
As you can see, it’s not really commander Shepard! As explained before, I’m not a character designer. One of the problems when you work on an indie game entirely on your own is that you are not always skilled for every step of the development, so you have to do the best that you can!
Anyway, don’t forget that CATYPH is a 1st person adventure game. It means that you will never see the suit of the hero, except during the CG movies! So if you like it or not, it won't really matter during the game!
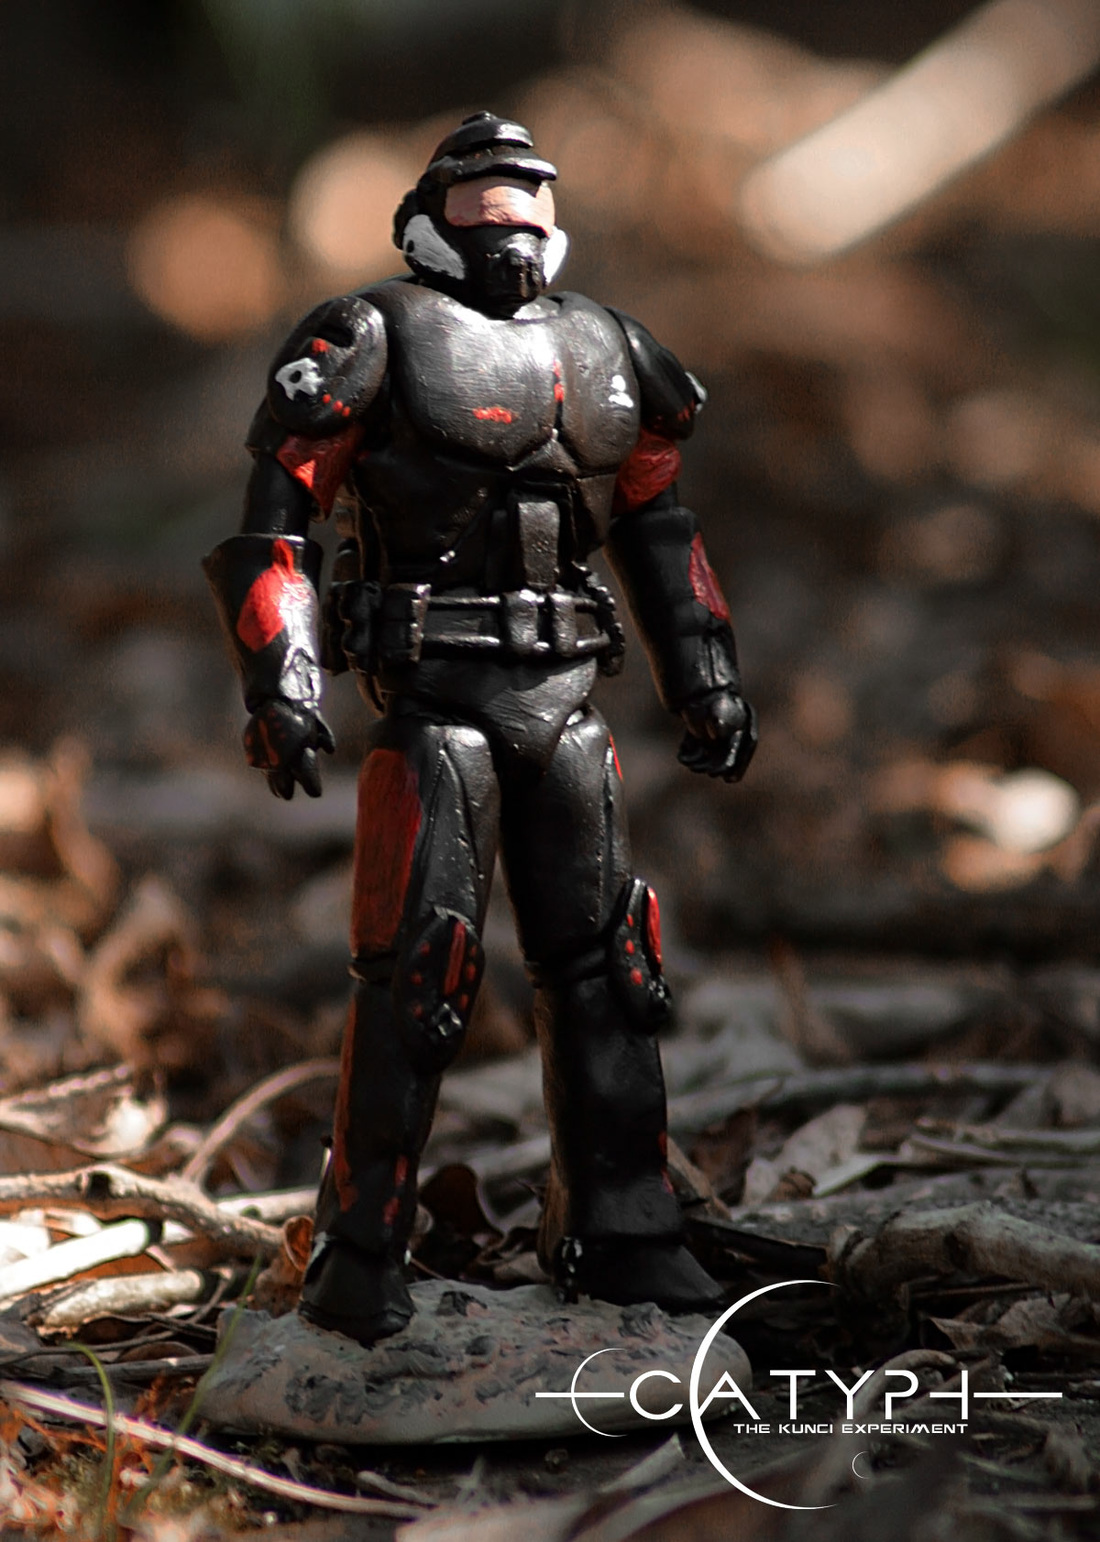
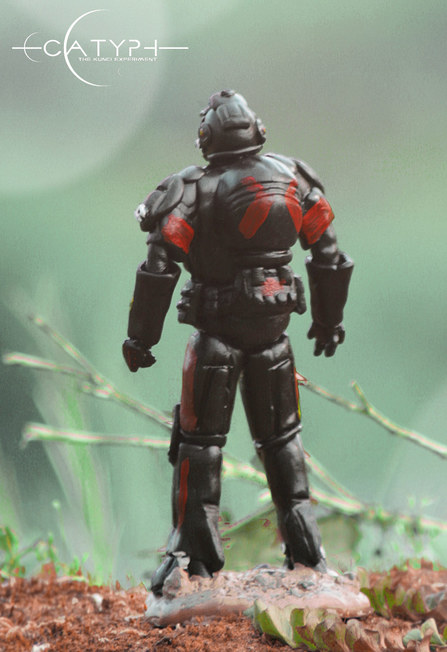
At some point, I even made a figurine in Fimo paste. It helped me finalize the pattern of the suit and check how real light is working on it. When you work on realistic renderings, it's always good to study reference photos.
Anyway, don’t forget that CATYPH is a 1st person adventure game. It means that you will never see the suit of the hero, except during the CG movies! So if you like it or not, it won't really matter during the game!
At some point, I even made a figurine in Fimo paste. It helped me finalize the pattern of the suit and check how real light is working on it. When you work on realistic renderings, it's always good to study reference photos.
|
|
Environments
I personally have 2 big steps in the Pre-production stage:
- Visuals
The Artistic direction was the one of the short film Catyph. It was a really good starting point for the game, because I knew exactly where I had to go in terms of design, environments, colors, technique.
- Ideas/Concepts
This is where I think of the level design, the main puzzles, the way you will travel through this strange world. I start to define the number of areas, what they will look like, what their main purpose is and how they will interact with the story (or vice-versa).

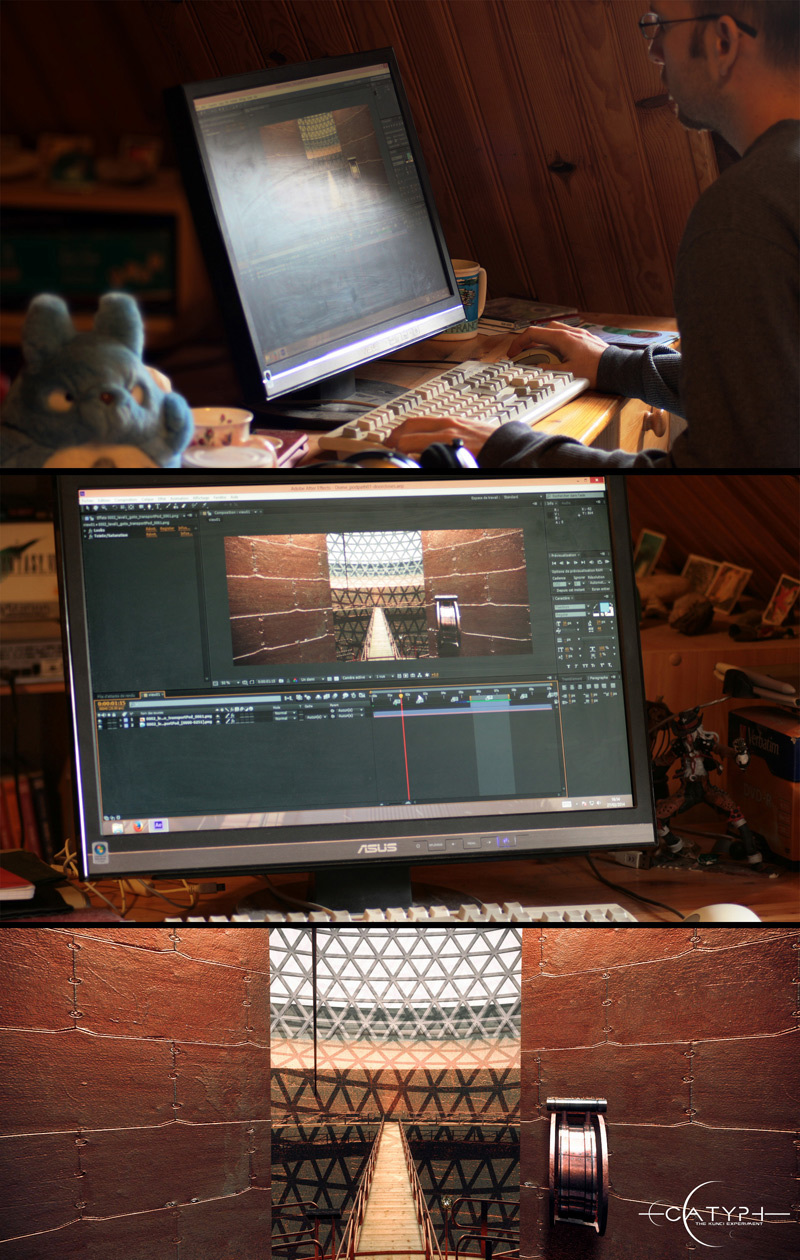
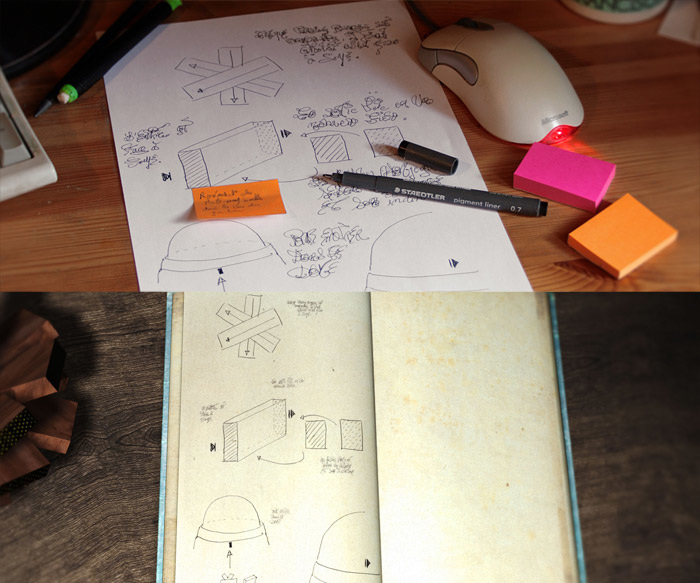
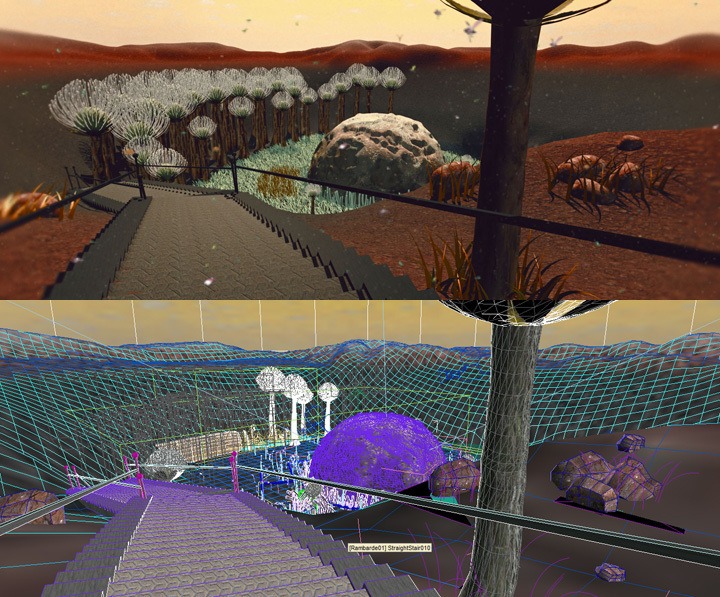
Before I start the actual modeling of any environment in 3D (which could lead to a significant waste of time if the resulting design is not good) I have to think carefully about any puzzles to be included. For me Puzzles are the most important part of the environment design process. I usually take time to draw out some ideas on a piece of paper. One of my favorite methods is to put these ideas on different coloured notepapers, which I can move around until I see a good combination, as you can see below (Top: Photo while at work Bottom: Result rendered in 3D)
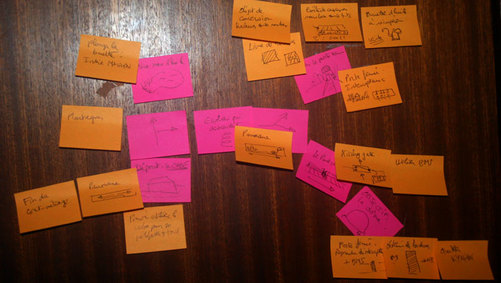
Working with coloured notepapers is perfect for a Myst-like, and it helps building the level design in no time. This is, for example, the result of the first region (Kynan), with all the papers on a board. It is probably not obvious from the photo, but the main paths are already defined here. The pink papers show the different places where we can walk, while the orange papers are ideas of events and puzzles. When this part is done correctly, it is a piece of cake to create the region in 3D.
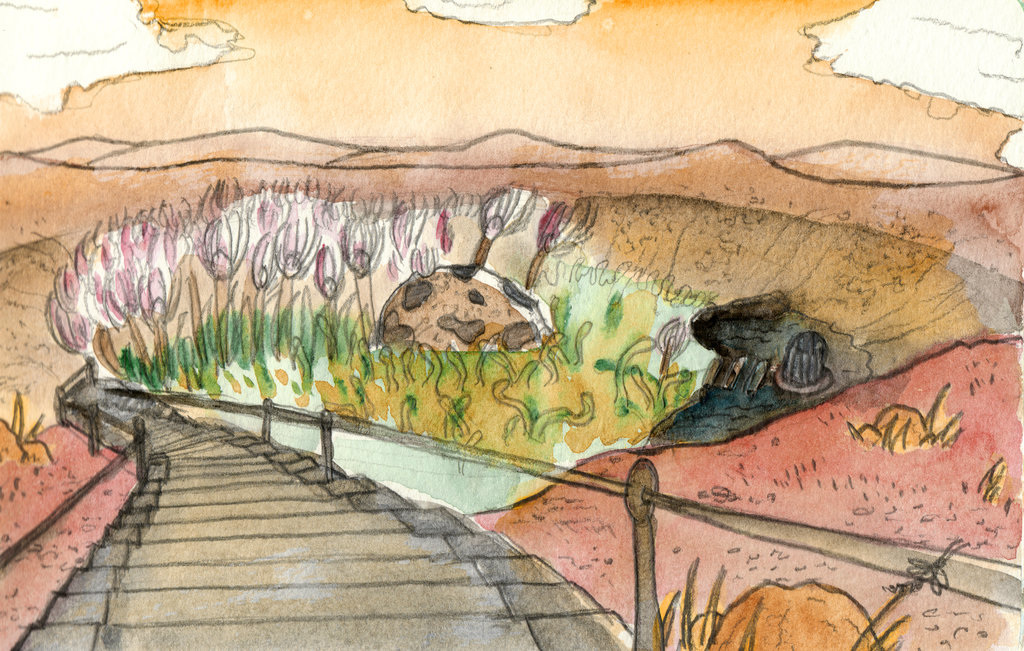
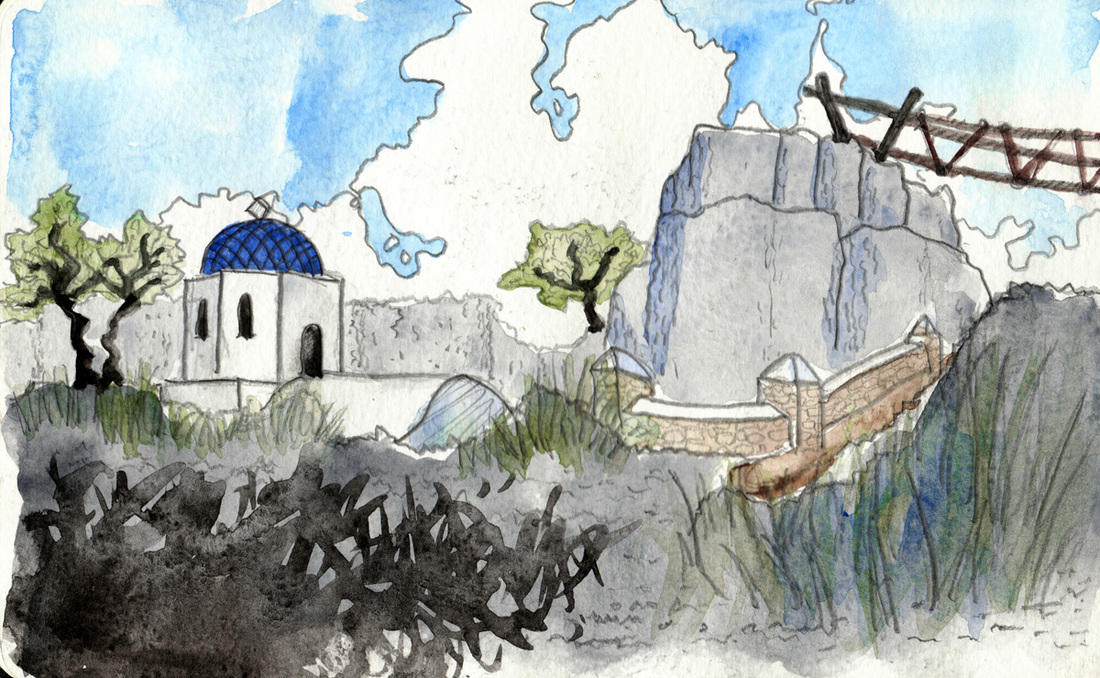
But before going through the modeling and 3D process, I find it useful to work on a quick watercolor illustration. Usually it is not accurate but it defines the main colors, feelings, objects, buildings... Here's the result for regions Saad and Darnaha:
Production
1 - Character modeling in 3D
I will start my explanation with the example of an interesting character from Catyph that I didn't reveal above. I could have chosen to tell you more about the hero in the black spacesuit, but we have already discussed him earlier, and it will be more interesting if I introduce you to the character named Germinal.
Initial sketch and ideas
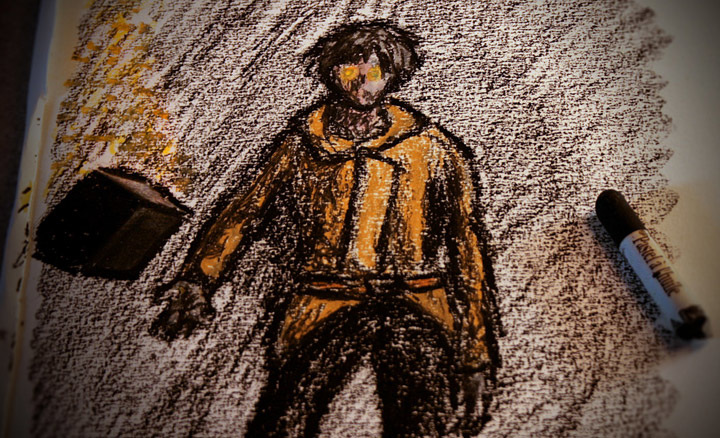
This is the initial sketch that I had done of Germinal, during the Pre-Production process. Please note that it should be done in the Pre-Production stage.
Initial sketch and ideas
- Text description: Germinal is a very mysterious being who rules in the system of Catyph. He lives on Tytaah like a God and it would appear that he has performed all kinds of experiments while on this moon. From time to time, he will get in touch with you and tell you his story. This is an important part of the scenario of the game, and also within the Black Cube series.
I wanted him to live in the darkness. We don’t know exactly what his feelings are because his face is hidden in the shadows. Is he a bad guy or not? What’s his purpose? What are his intentions? And on top of that, he has these yellow glowing eyes that can be scary. This is in fact one result that the power of the Cube has had on his body. I liked this idea which reminded me of the character of Cloud in Final Fantasy VII, who was said to have strange glowing eyes because of the Mako energy. But what exactly happened to Germinal? What does he want? Does the “fire” in his eyes represent anger? - Sketch: These sort of questions (above), are very important during the creation process. This is why you should have created a profile of each character during the Pre-Production stage. With this help, you can make a rough sketch of your character.
This is the initial sketch that I had done of Germinal, during the Pre-Production process. Please note that it should be done in the Pre-Production stage.
So at this stage we should have sketches and text descriptions of our main characters and we should be ready to begin with the 3D process. Let's see in details.
3D creation process
I cannot show the exact steps of the modeling of Germinal for 2 reasons:
1 - A significant part of the 3D model was created by a member of The icehouse (an artists' collective I belong to).
2 - I didn’t initially plan to write this “Making of”, so we didn’t keep any screenshots of the modeling.
However, I can explain how it works.
Box Modeling
I have done a series of screens to explain the process of what is usually called Box Modeling. The main idea is, simply, to start with a Box and add details to it, until you reach the desired shape. It can be a very long and complicated process, depending on the level of detail you want to achieve, and you need to keep in mind the limitations caused by the use of polygons (file size, level of detail, etc.)
This series of screens is intended for illustration purposes only, not educational, and should you decide to try Box Modeling on your own, you should probably look for a good tutorial.
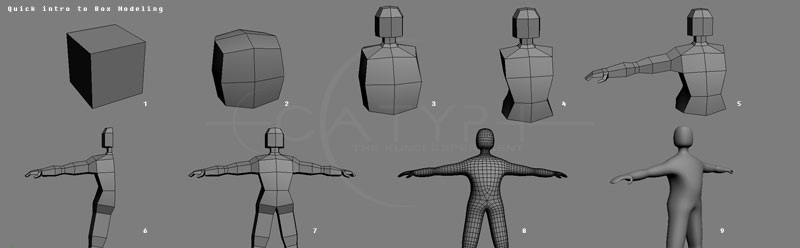
As you can see, the process starts with a box. Then you cut it here and there in order to add edges, and you just extrude the faces of your choice, until the box becomes what you want. Here I made a very simple humanoid from one single box, but you would usually use one box for the head and another one for the body. It can be taken even further if you want specific clothes, hair, etc. What I show above took maybe fifteen minutes of work (maximum). But creating a whole character can easily take several days.
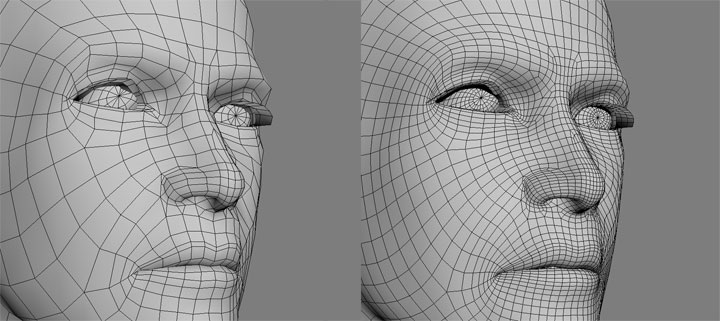
When you have reached steps 7 - 8 of the Box Modeling above, you continue adding a lot of details until you reach a good result. Below is what we did for Germinal:
When you have reached steps 7 - 8 of the Box Modeling above, you continue adding a lot of details until you reach a good result. Below is what we did for Germinal:

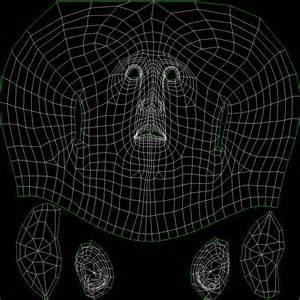
Texturing, Rendering
The final model certainly appears too grey. We need to create the glowing eyes, the skin, and add colors to the clothes. You cannot easily paint your 3D model in, for example, Photoshop (update: it should now be possible in the latest versions), so you need to flatten the 3D design in order to paint it in 2D. We call this process the “unwrap”, and it means what it implies. For example, an unwrap of the head can look like this:
Then simply use your favourite graphic editing software, e.g. Photoshop or Gimp, and paint/colour the details of the skin on the unwrapped picture. Once I had finished, I imported it onto the 3D model, and here is the result:
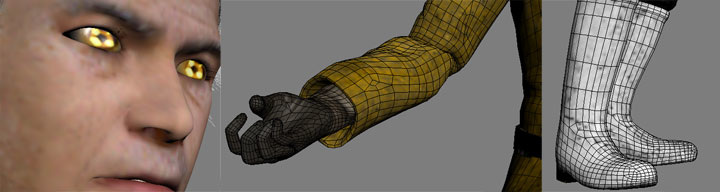
It’s almost complete. This whole process has to be followed for each character of the game, and it is... time consuming. I just wanted to render this 3D model of Germinal with good lighting and finer textures to show you the result:

2 - Environment modeling in 3D
Modeling the environment in 3D uses the same technique as with characters: the “Box Modeling” technique (see earlier). You start from a cube that you cut, or extrude, until you obtain your final model, such as a house, a lamp, a rock… The general idea of box modeling is to use a box at the beginning, but it can be easier to start with a sphere or any other geometric shape. If you want to model an ice cream, it might be easier to start with a cone, for example.
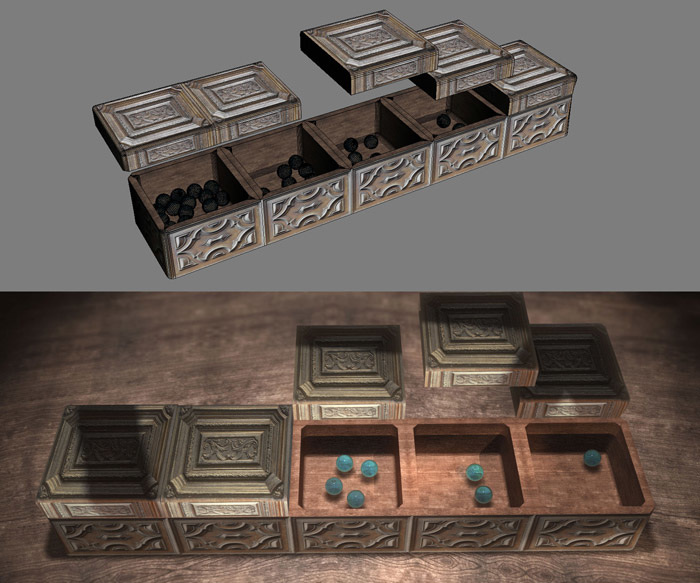
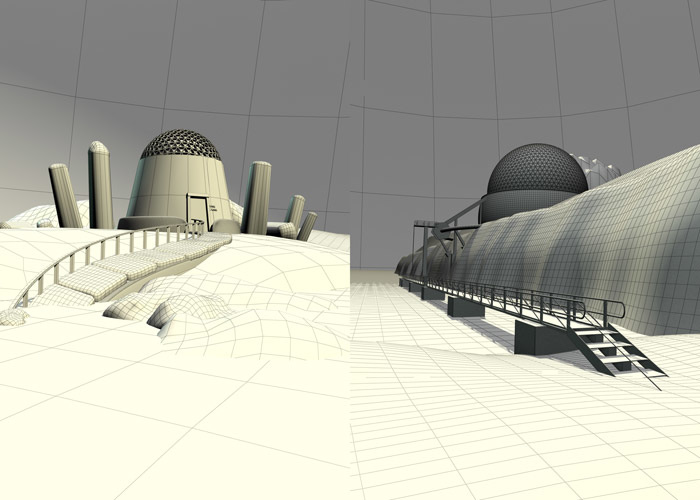
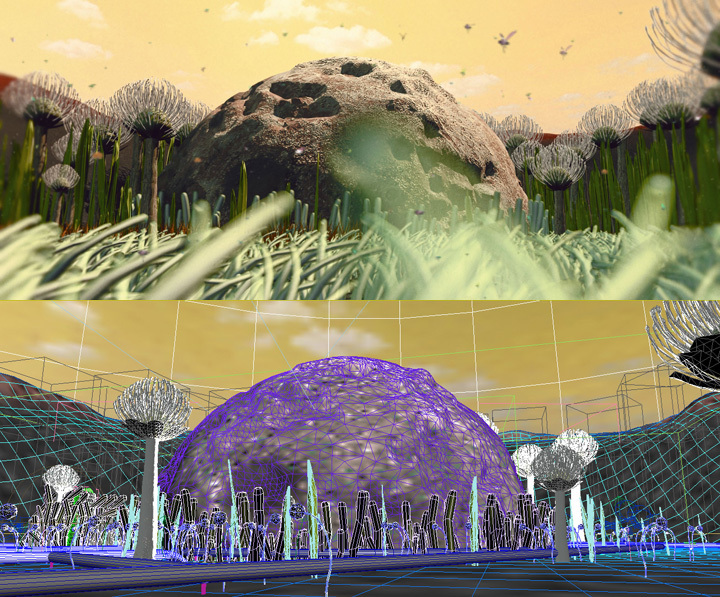
So I created the objects of the region of Kynan. Every constituent part of the environment needs to be modeled, from the gigantic Dome to the apparently most insignificant thing:
So I created the objects of the region of Kynan. Every constituent part of the environment needs to be modeled, from the gigantic Dome to the apparently most insignificant thing:
The puzzles are also created in 3D using Box Modeling. However, they have to be made in several pieces, in order to allow them to be able to interact in future parts of the game. The tops of this box have been created separately so they can be opened later when you click on them:
Modeling 3D objects can be long but shouldn't be an obstacle. The most important is to place logically all these objects together in a single scene, so that we can visit a world and not just various objects that were left here and there. It's all about level design. That is why we need to know exactly, from the pre-production process, what the region will be like. Let’s take as the example Kynan, which has been revealed in the first gameplay trailer. In order to design this region, I first needed a starting point and then an arrival. The starting point was easy to identify: it was the end of the introduction short film.
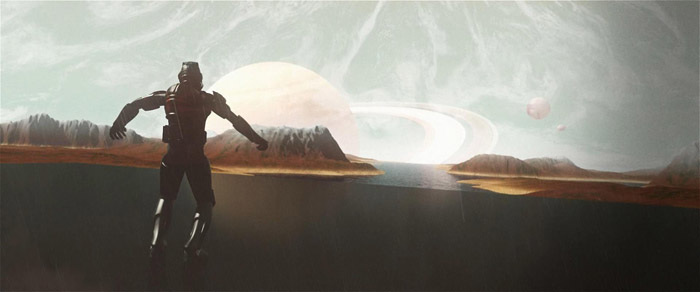
The first thing that happens in the game, therefore, is that you observe the landscape from this position, through the eyes of the astronaut. Next what is needed is an objective or goal which, in turn, both defines the reason for your presence on Tytaah, and the actual design of the Region of Kynan itself. This goal was also revealed at the end of the short film: your AI and your contact on Terra had both discovered previously unknown buildings behind where you land. This provides the perfect reason to visit the location and to start the quest.
We now have 4 of the requirements necessary to create the environment of Kynan:
I would like to add a 5th one that is very important: the region’s topography. Not only is the land designed/created to serve the puzzles, but also, the puzzles are designed/structured depending on the topography of the land.
To summarize, the land needs to be shaped by these concepts: beginning, ending, puzzles, topography, and story. Kynan is a plain of red sand with hostile rains of liquid methane. There’s no life, the sky is greenish, everything is a bit dull, and it is mostly flat. You will want to move on as quickly as possible to visit other new regions.
But it would (however) be much too easy to just enter the Dome, so there’s a closed gate obstructing the middle of your path. It’s always like that, isn’t it? It implies finding a key or something else to be able to open the gate. It implies that an intelligent lifeform has created these structures and probably wants to stop your forward progression. As a result, there might be other buildings. So, in addition to this giant Dome in Kynan, I added a small building called The House of the Domekeeper. It almost certainly hides clues as to how to open the gate, but unfortunately, its door is also closed. It’s up to you to use your brain now. I don’t really want to reveal any more, but can you now begin to see the logical progression in the creative process?
If I don’t have these general ideas before I start working on the design of an environment, I find that I can’t create a structured or logical path for the player to follow in the game.
All the regions are created using the same process. Most of the time, the answers are to be found in the same region. Sometimes you will have to read the datalog to find a tip. Generally, you simply have to be a good observer and note down things on paper. This is how I conceived the world of Catyph.
Finally everything is assembled together: my notes on coloured papernotes (see Pre-Production), the 3d modelings of all objects, and the land. The result of Kynan without any textures, colors and lighting, can look like this:
We now have 4 of the requirements necessary to create the environment of Kynan:
- The starting position from the Cube
- The action of going to the Dome
- Making the storyline evolve
- Adding puzzles at the appropriate place/s
I would like to add a 5th one that is very important: the region’s topography. Not only is the land designed/created to serve the puzzles, but also, the puzzles are designed/structured depending on the topography of the land.
To summarize, the land needs to be shaped by these concepts: beginning, ending, puzzles, topography, and story. Kynan is a plain of red sand with hostile rains of liquid methane. There’s no life, the sky is greenish, everything is a bit dull, and it is mostly flat. You will want to move on as quickly as possible to visit other new regions.
But it would (however) be much too easy to just enter the Dome, so there’s a closed gate obstructing the middle of your path. It’s always like that, isn’t it? It implies finding a key or something else to be able to open the gate. It implies that an intelligent lifeform has created these structures and probably wants to stop your forward progression. As a result, there might be other buildings. So, in addition to this giant Dome in Kynan, I added a small building called The House of the Domekeeper. It almost certainly hides clues as to how to open the gate, but unfortunately, its door is also closed. It’s up to you to use your brain now. I don’t really want to reveal any more, but can you now begin to see the logical progression in the creative process?
If I don’t have these general ideas before I start working on the design of an environment, I find that I can’t create a structured or logical path for the player to follow in the game.
All the regions are created using the same process. Most of the time, the answers are to be found in the same region. Sometimes you will have to read the datalog to find a tip. Generally, you simply have to be a good observer and note down things on paper. This is how I conceived the world of Catyph.
Finally everything is assembled together: my notes on coloured papernotes (see Pre-Production), the 3d modelings of all objects, and the land. The result of Kynan without any textures, colors and lighting, can look like this:
3 - Textures and rendering
Basic render
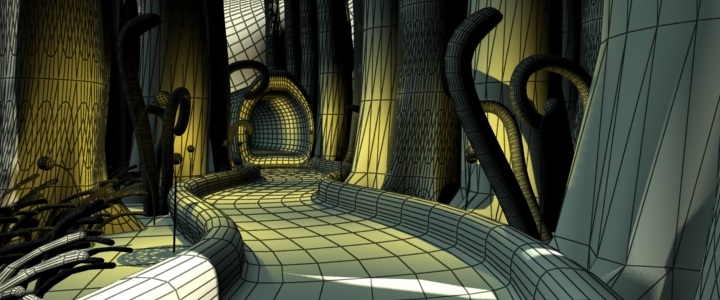
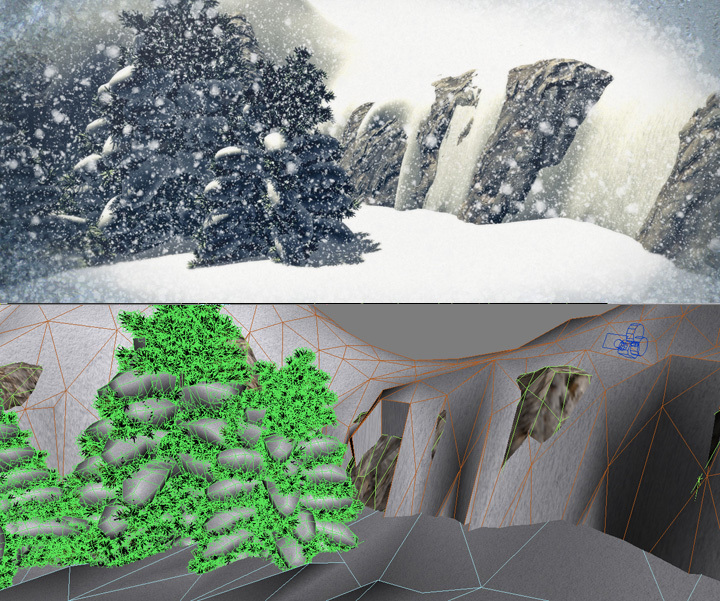
From now on, I will assume that you have understood what Box Modeling is about. So I have previously modeled my environment in 3D and we can see a very grey scene, not really what you want to visit in a game. Here's another similar scene that I will choose for the example, in the region of Saad:
From now on, I will assume that you have understood what Box Modeling is about. So I have previously modeled my environment in 3D and we can see a very grey scene, not really what you want to visit in a game. Here's another similar scene that I will choose for the example, in the region of Saad:
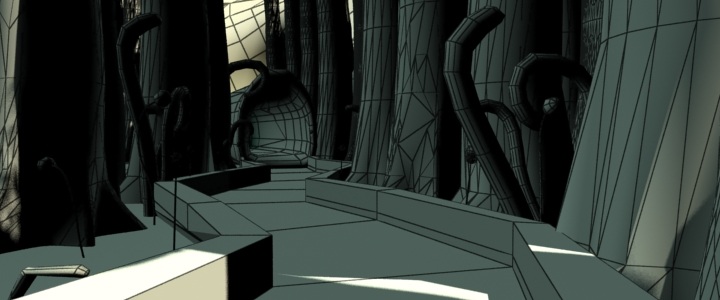
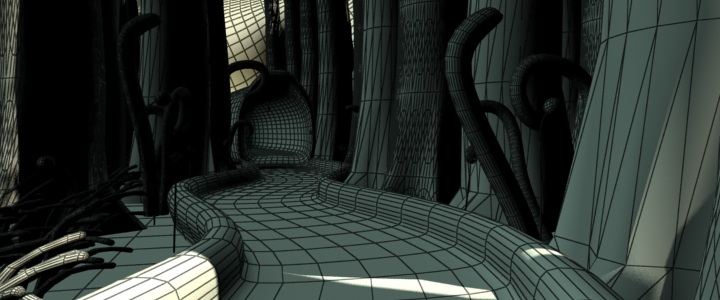
Before we even start thinking of textures and lighting, we first need to consider and fix the number of polygons. You probably see above that everything is very sharp, with strong angles. We usually want 3D models to be smooth, curvy, not square-shaped and sharp-edged like on a Nintendo 64. The amount of polygons in a scene is calculated by the computer during the rendering stage. The purpose is to save on memory usage while I am working (the more polygons in a scene, the slower the pc!). So, I will normally work on a scene in low poly (like above), but the result after render is as follows. Can you see the difference?
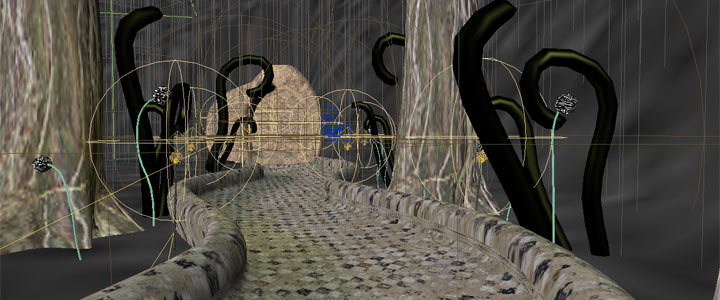
Adding lights
You probably want to get rid of the greys and to add some textures, which is the purpose of this chapter; however I find it better to work with lighting first. The reason is that it’s easier to see the shapes, lights and shadows using the grey models. Once you have textures in a scene, you tend not to focus as much on the lighting.
Let’s add a series of 3D yellow lights for each of the lanterns in the scene. I think it’s much better as a visual experience with some lights. I like how the lanterns spread their light onto the trees. Here I am showing the final result, but it normally takes quite some time trying different lighting possibilities. Usually you’re not happy with the first try!
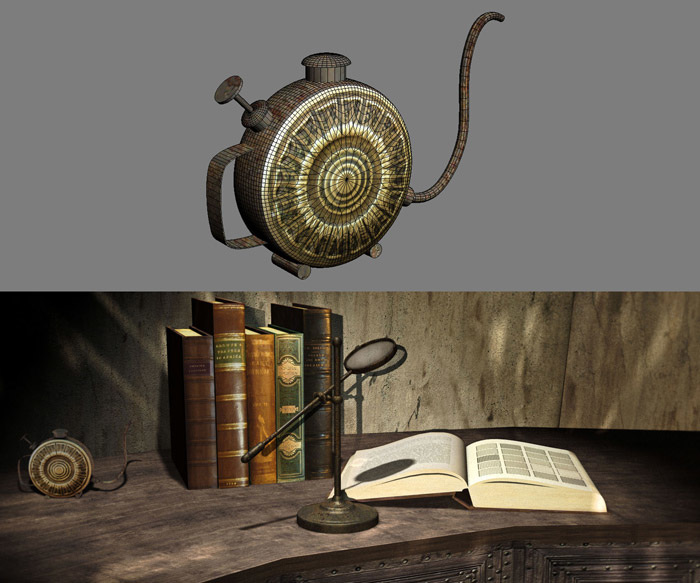
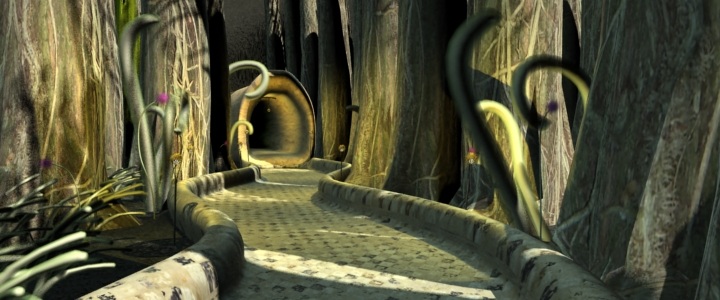
Textures
Time to add textures now! This is a lengthy process that needs to be done carefully. For each model in the scene (grass, tree, soil, lantern, etc.) you need to take photos or use libraries of textures, and choose the ones that best fit your objects. As an example, let’s look at the small lanterns. I used 3 different textures for these objects: a golden metal for the main sphere, a glowing yellow for the bulb, and a dark grey bronze for the main body. You continue in the same way for each model of the scene, until you have textured the whole scene. I got this result:
Time to add textures now! This is a lengthy process that needs to be done carefully. For each model in the scene (grass, tree, soil, lantern, etc.) you need to take photos or use libraries of textures, and choose the ones that best fit your objects. As an example, let’s look at the small lanterns. I used 3 different textures for these objects: a golden metal for the main sphere, a glowing yellow for the bulb, and a dark grey bronze for the main body. You continue in the same way for each model of the scene, until you have textured the whole scene. I got this result:
I know it’s still not convincing, but this is what I see using my 3D software when I work. This is real-time, and it is not meant to be used as it is shown. What I wanted to show you was the progression between each step! Now let’s make a final render with textures:

Render times
To conclude, I’d like to talk a bit regarding the rendering times (which is purely a PC calculation – There is no human intervention required). This is an important factor to take into account when you create pre-rendered 3D, because your PC will be totally occupied doing it at some time.
When you work in real-time 3D, you spend a lot of time trying to optimize your scene, in order to have as low a content of polygons for example. You are probably aware that real-time 3D is dependant on the technical limitations of your equipment. A game for a powerful PC will be much more beautiful than a game on Nintendo DS (technically speaking). But using pre-rendered 3D is different. You will have the same kind of rendering on virtually any hardware, because we’re talking about pictures (jpg, bmp…). It’s not 3D anymore. However, there comes a time when the computer needs time to render these pictures. The last picture displayed above was calculated in around 2 minutes (720px wide). So you can see it’s not an instantaneous result.
So:
- in real-time 3D: you spend significant time in order to optimize the scenes
- in pre-rendered 3D: you don’t optimize as much, but you spend time during the rendering calculation performed by the PC.
In Catyph, I will probably have 200 scenes at 1080p resolution. Each frame of these scenes takes around 3 minutes to render. I also have to take into account the video transitions between each scene. A video is maybe 3 seconds long, and runs in 25 frames per second.
Now let’s do a quick calculation. If, as I suppose, I have 200 videos of 3 seconds, which means that the PC has to render 600 seconds in total (200videos x 3s). If, for each of these videos, you have 25 frames/s, it means that there are 15 000 frames to render (600s x 25fps). Do you follow me?
Finally, as I mentioned earlier, my PC needs 3 minutes (180s) to render 1 frame. It implies that, for the totality of the 200 video transitions, it needs 2 700 000 seconds, or 750 hours! That means 1 full month of processing, solely dedicated to renders!
4 - Compositing, editing
When you work with 3D and want a beautiful picture, there are 2 possible options:
The last 3D picture from the previous part (above) would need more depth, more contrast probably, and maybe a subtle color adjustment. But we can’t change the intensity and colors of the 3D lights anymore. It’s too late, unless we make a new 3D render (which we don't want, in order to save time). Keep in mind that, from now on, we’re talking about pictures (jpg, bmp, etc…), not about the previously described 3D scenes. This might be obvious to many people, but it is important to be aware that you cannot change the details of the picture (grass, textures, light, models…) without making another render in your 3D software.
So let’s talk of the different possibilities we have to improve a rendered picture. This is what I call compositing (which englobes several things, including working with other layers such as Z-depth). I have put together a non-exhaustive list of techniques.
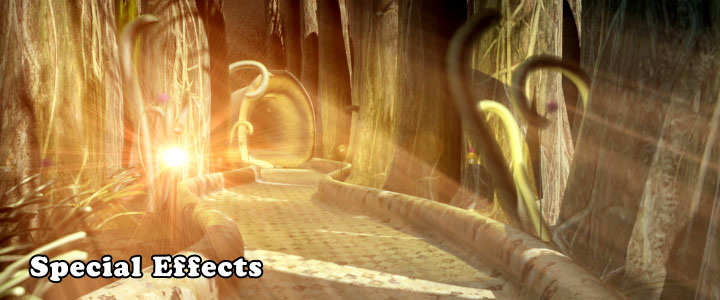
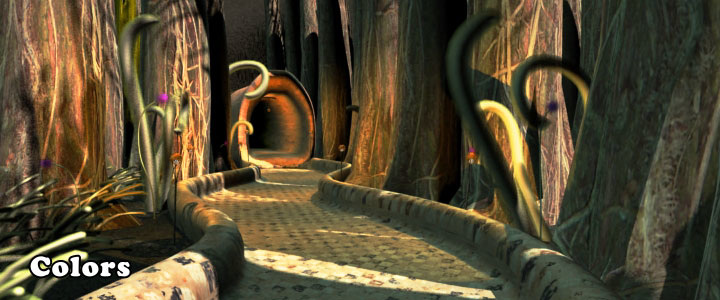
The most obvious idea is to work on colors. I personally consider that the original picture appears too yellow. Yellow tints are interesting, because they remind you of the sun. But if you’re not careful, it can be very unpleasant and remind you, for example, of a yellow stain on your new white t-shirt. This is somehow what I feel when I look at the yellow areas in the 3D render above. We can make it more reddish, as if the sun was lower in the sky.
Unfortunately, however, merely changing colors is, most of the time, not enough to create a nicer picture. That’s where it becomes interesting to add special effects (FX). FX can be a ‘lens flare’ to simulate the reflection of the Sun in the camera lens. Or it can be smoke, particles, light rays… There are probably infinite possibilities as soon as you start playing with them.
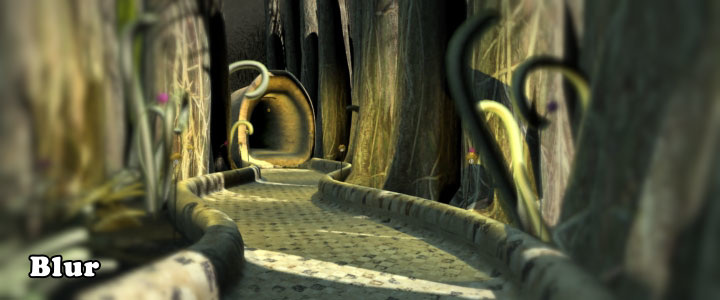
You can also work on blurring. Blurry areas can hide some of the problems in your pictures, which is frequently helpful if you don’t have the time to re-render the 3D scene. They can also help to focus on a specific part of the picture. And blurs can be beautiful too!
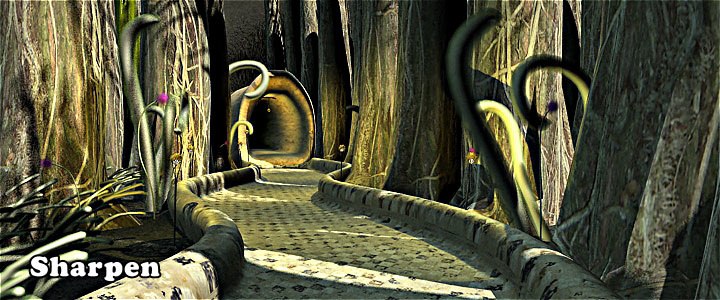
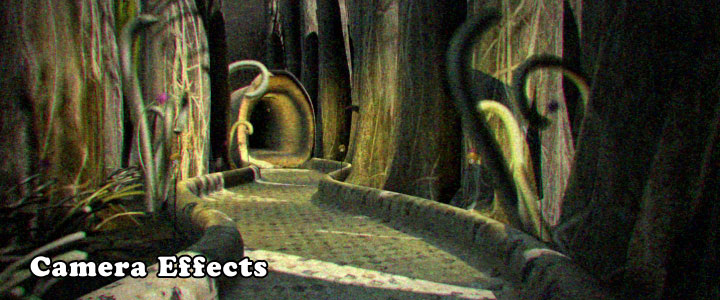
Let’s finish this short list with 2 very useful filters. It is often the case that the raw 3D render is a little bit blurry (this can be due to the anti-aliasing filters in the 3D software), so it is often a good idea to sharpen the final picture. In addition, there are many other filters that can simulate the different qualities of a camera lens, such as noise, grain, or also film damage, TV effects… These are very helpful ones for the immersion in a sci-fi project, when strange events can happen! It can leave you breathless.
For now that is it in relation to the most common effects that I can describe in this section. There are even more possibilities that require working with several additional passes. I often do that with an Ambient Occlusion pass and a Z-depth pass. Working with passes brings more sense to the word “Compositing”. There is, for example, a good illustration of possible editing passes here:
http://core-cg.com/documentation/_static/contact_sheet.jpg
This is, however, a bit more technical and I wanted to keep this “making of” relatively easy for everyone to understand.
I know it’s too intense below, the result is deliberately overdone, but here are a few pictures that illustrate my previous explanations. The top left picture is the raw 3d render from before.
- You work carefully on every detail and setting until you are fully satisfied of the result. This will take hours.
- You make a nice picture and you improve it using compositing/editing software (Photoshop, After Effects are the best known software programs). This is a good compromise in terms of time/quality.
The last 3D picture from the previous part (above) would need more depth, more contrast probably, and maybe a subtle color adjustment. But we can’t change the intensity and colors of the 3D lights anymore. It’s too late, unless we make a new 3D render (which we don't want, in order to save time). Keep in mind that, from now on, we’re talking about pictures (jpg, bmp, etc…), not about the previously described 3D scenes. This might be obvious to many people, but it is important to be aware that you cannot change the details of the picture (grass, textures, light, models…) without making another render in your 3D software.
So let’s talk of the different possibilities we have to improve a rendered picture. This is what I call compositing (which englobes several things, including working with other layers such as Z-depth). I have put together a non-exhaustive list of techniques.
The most obvious idea is to work on colors. I personally consider that the original picture appears too yellow. Yellow tints are interesting, because they remind you of the sun. But if you’re not careful, it can be very unpleasant and remind you, for example, of a yellow stain on your new white t-shirt. This is somehow what I feel when I look at the yellow areas in the 3D render above. We can make it more reddish, as if the sun was lower in the sky.
Unfortunately, however, merely changing colors is, most of the time, not enough to create a nicer picture. That’s where it becomes interesting to add special effects (FX). FX can be a ‘lens flare’ to simulate the reflection of the Sun in the camera lens. Or it can be smoke, particles, light rays… There are probably infinite possibilities as soon as you start playing with them.
You can also work on blurring. Blurry areas can hide some of the problems in your pictures, which is frequently helpful if you don’t have the time to re-render the 3D scene. They can also help to focus on a specific part of the picture. And blurs can be beautiful too!
Let’s finish this short list with 2 very useful filters. It is often the case that the raw 3D render is a little bit blurry (this can be due to the anti-aliasing filters in the 3D software), so it is often a good idea to sharpen the final picture. In addition, there are many other filters that can simulate the different qualities of a camera lens, such as noise, grain, or also film damage, TV effects… These are very helpful ones for the immersion in a sci-fi project, when strange events can happen! It can leave you breathless.
For now that is it in relation to the most common effects that I can describe in this section. There are even more possibilities that require working with several additional passes. I often do that with an Ambient Occlusion pass and a Z-depth pass. Working with passes brings more sense to the word “Compositing”. There is, for example, a good illustration of possible editing passes here:
http://core-cg.com/documentation/_static/contact_sheet.jpg
This is, however, a bit more technical and I wanted to keep this “making of” relatively easy for everyone to understand.
I know it’s too intense below, the result is deliberately overdone, but here are a few pictures that illustrate my previous explanations. The top left picture is the raw 3d render from before.
|
|
5 - Summary
Before I continue to explain the Production stage, I would like to summarize the creation of the environments using a series of screenshots.
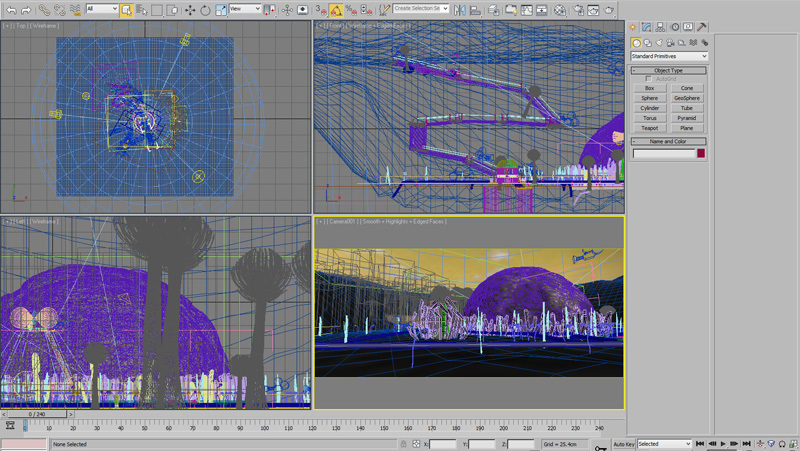
The 2 next pictures will show exactly what I see in the 3D software when I work. Each scene that is opened in 3dsmax is usually viewable in 4 views:
- Top
- Left
- Front
- Perspective
That you can easily switch between, in order to get additional views, such as:
- Bottom
- Right
- Back
- Camera
Within these views, you can select each 3d object, light, model, or camera, and define its parameters.
In the screenshot below, nothing was selected in the scene, and as a result you have the option on the very right to create new objects, such as a box, cone, sphere, etc… (See the buttons in the very right column?) These primitive objects are the ones we normally use to create new advanced objects, using the technique of Box Modeling that was described earlier.
In the next screenshot, a specific camera was selected (it is visible in white, in the bottom left corner). When a camera is selected, the options of the very right column change, and display the different parameters of the camera. You can change for example the lens, field of view, the type of camera (free or targeted), and many other settings such as the depth of field and environment ranges.
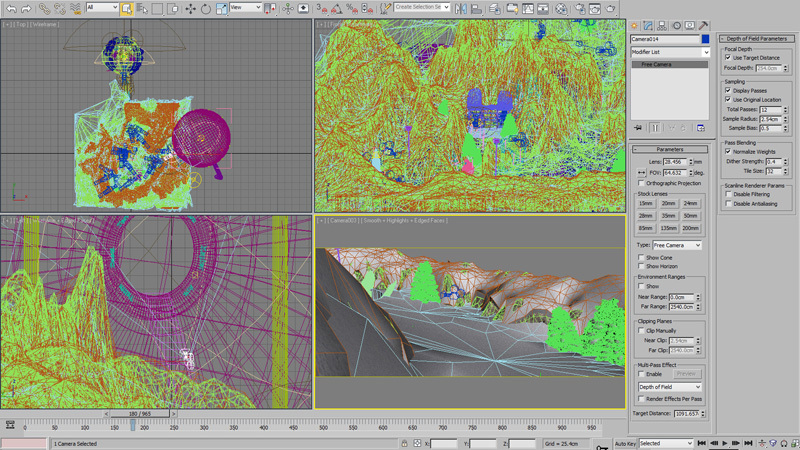
It’s probably not really obvious with these small screen captures, but there really are a lot of possible parameters.
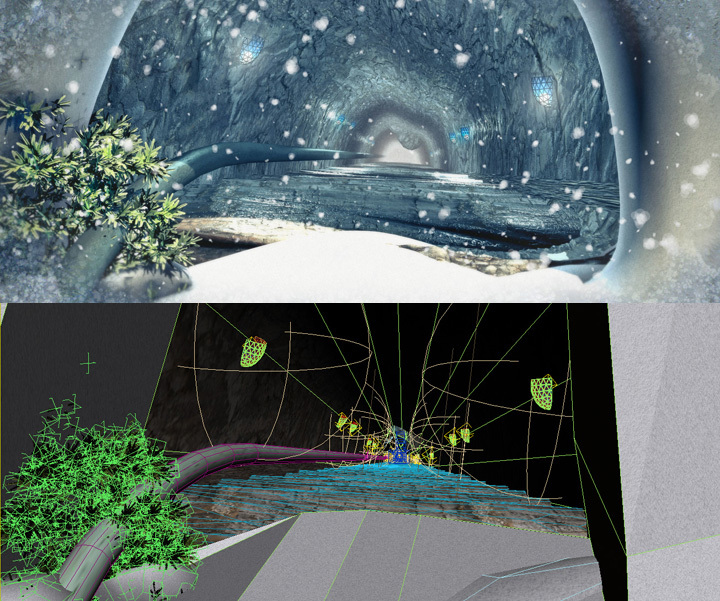
While working, the most important view is the one on the bottom right, which was set here to be the Camera view. It shows exactly what I want the player to see in the game. This view is, as we say, “shaded”, which means that the textures, materials, shadows and other effects are visible in real-time, but as a preview only (i.e. very poor quality). By comparison, the 3 other views in each of the screenshots above is set to “wireframe”, which means that we can only see the edges of the geometry. It makes the display much faster. Each object of the scene has a different wire color, in order to distinguish them.
When the Camera view is good and when I am happy with the result, I can start the Render process, which was explained before. Now, you have seen more or less all the steps of the production in these screenshots (from modeling to rendering).
|
|
6 - Export to game engine
I know that everything written until now may not always be totally accurate or easy to understand, but I hope you did get the main concepts. From my point of view, we have completed the largest part of the production stage: how to create a world in 3D. This 3D world, after the render stage, is now a series of jpg & png pictures, and video transitions or cutscenes.
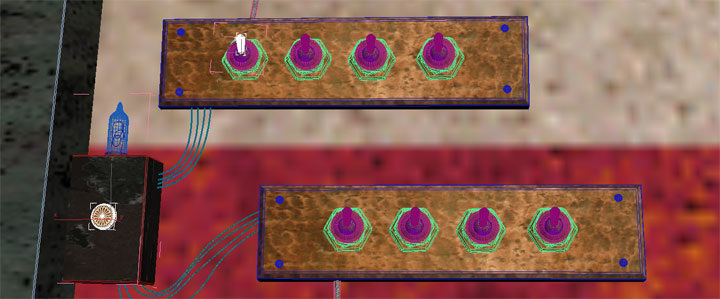
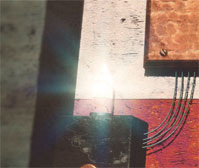
It is time to place all the separate elements into order to use them in the next stage of the development: importing into the game engine (Visionaire Studio in this instance). Let's see how to create our first puzzle. It’s an easy one, with only a few switches to turn on or off. Here’s a screenshot of this puzzle as you can see it in the Catyph Trailer #1:
It is time to place all the separate elements into order to use them in the next stage of the development: importing into the game engine (Visionaire Studio in this instance). Let's see how to create our first puzzle. It’s an easy one, with only a few switches to turn on or off. Here’s a screenshot of this puzzle as you can see it in the Catyph Trailer #1:

This kind of puzzle is quite easy to create in Visionaire. The most important thing to do is to prepare the different elements that will move/change, or will be interactive with the player. From the above picture, we can think of the switches themselves, the light bulb that will turn on or off, and the hotspot icons (help arrows).
Each of these interactive elements has to be saved as a separate picture. The background picture will be the same puzzle, without any of these interactive pieces. Then we add PNG pictures with alpha, or jpg pictures (to save disk space), as layers above the background.
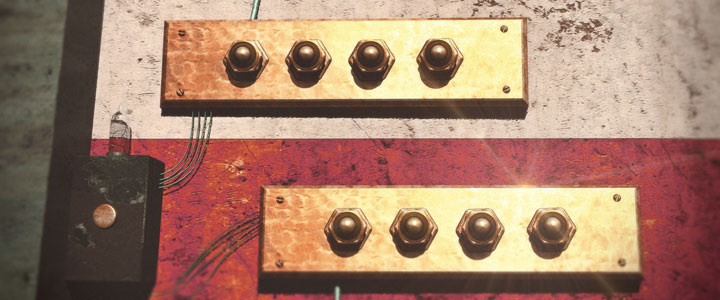
In order to include these separate elements, we have to anticipate this requirement and prepare them in the 3d software. Here’s the 3D scene:
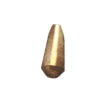
In this 3d scene, I have already selected (in white) some of the interactive parts that we need to separate. I will render each of them in small PNG pictures, one after the other. Here are these pieces below:

|
|

|
The white areas around these pictures are saved as transparent (alpha). I also have to anticipate the action/s required to turn on the light bulb. Here it is more difficult to render the transparency because of the lighting effects that spread onto the background, creating different ranges of shading. So I prefer to render a jpg picture that I can crop correctly:
All that remains to do are the additional elements such as the visual aids and special effects (FX). The main FX of this scene involves a short animation of rain. I created it in After Effects with a well-known particle plugin. The whole animation will load into memory, so I have made it very short. It also needs to loop forever in order to reproduce the impression of incessant rain.
Here’s a single frame from the whole rain animation:
Here’s a single frame from the whole rain animation:

The white area is, again, transparent. I followed the same procedure and used After Effects to animate small icons for the hotspots (blue dots and red arrow).

|

|
Finally we need to hide the previous pieces in the 3D scene and make a render of the background alone (as you can see below, the switches were hidden in this case).
And then we have everything that we need. I’m sure you have guessed what happens now: we need to create a stack of layers in Visionaire in order to recreate the puzzle, including all of these separated elements. This is the result we can expect:
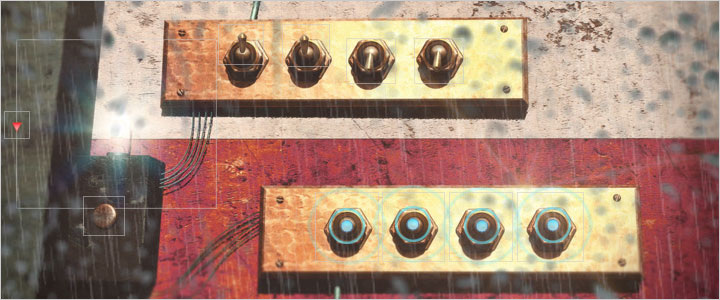
28 layers were needed for this simple puzzle.
- 1 background
- 1 pressed button under the bulb
- 1 bulb turned on
- 8 switches up
- 8 switches down
- 1 red arrow hotspot
- 8 blue dot hotspots
This picture was created as an illustrative example, in order to check that all the pieces involved will work with each other. What I mean is that the puzzle is not completed yet. We have the graphics ready, that’s true, but there is still one more stage required to complete the puzzle: scripting the actions that link everything within the game.
7 - Development and puzzle scripting
|
A few words regarding Visionaire
I am aware that the previous parts of this Making Of may have been quite complicated if you’re not a graphic designer. Not everyone owns a 3D software and knows how to use it, even if some programs are easily accessible (e.g. Blender, licence free, with a lot of tutorials available). Happily it is also possible to create an adventure game without using any 3D software. If you’re good at drawing things or taking photos, you can build a game using Visionaire quite easily at home and I would like to encourage you that way. You can, for instance, paint beautiful watercolors and scan them: they can then become great backgrounds within your game project. Visionaire Studio 4 “Indie Single user” license is available for around 49€ and allows you to create commercially viable indie games such as Catyph (it is the license I use). http://www.visionaire-studio.net/shop/category/adventures-english/ |
Originally, Visionaire was intended to produce 3rd person adventure games like Deponia, so you can of course spend some time on the animation of a hero, and work on the adventure of your dreams. If you’re fond of Monkey Island, Machinarium or Myst, simply choose the game-style you prefer and create your own game with your own style (retro/pixilated, realistic, cartoon…).
If you’re really happy with how your games have developed, you can also purchase more advanced versions, such as the “mobile” version that allows export to Android/iOS (490€), or a “pro” version that will allow you to work with several people and distribute your game physically (1490€) without any limits. I have not had yet enough success with my games to afford buying it!
Fortunately I’m making Catyph on my own, so the cheap indie version is perfect! There is an evaluation version available too, if you’re interested. It would probably be a good idea to get familiar with it, if you wish to more fully understand my explanations, and also be able to do developments of your own.
The main concept behind Visionaire is to allow anyone to create an adventure game without having to write a single line of code. It may sound magical, but it still doesn’t prevent you from “writing” scripts. In Visionaire, a script is a list of several pre-defined Actions that you select from a list. There are plenty of possibilities and you can probably create everything you want.
How it works
You first need to create a new scene in Visionaire, with a background picture and several “hotspots” (clickable areas). On the very left of the editor, there is the list of scenes I have created for the prototype of Catyph.
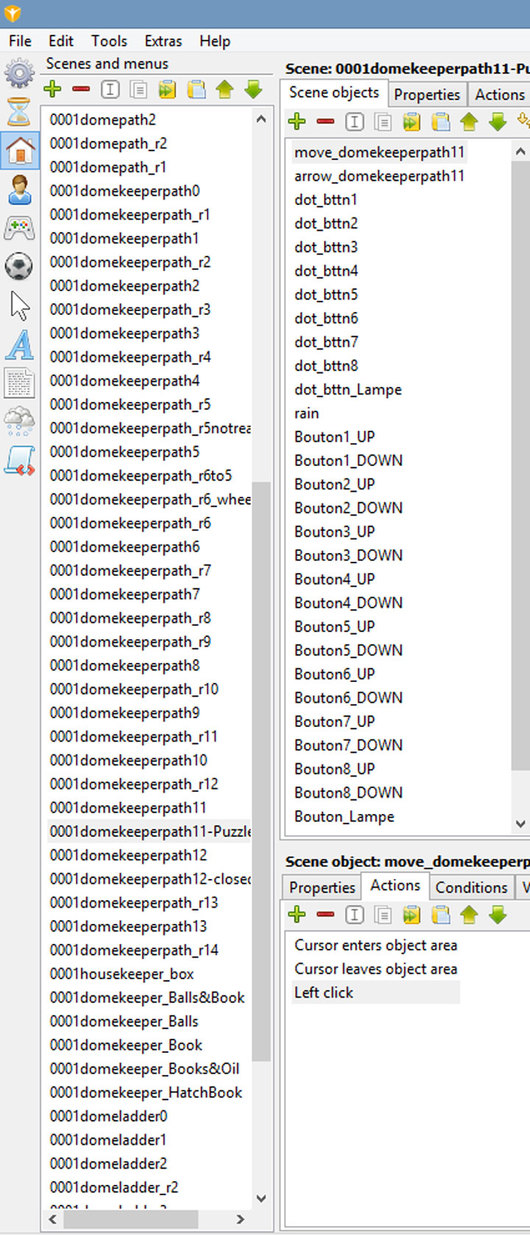
This is what a basic scene looks like (see picture below). At this stage, I have just imported the background that I had prepared previously, for the puzzle with the switches:

The scene of this puzzle has been selected in the left column, and the list of objects for this scene is currently showing as empty in the second column - we just have a “back” (background) layer selected in blue at the top (can you see?). Next you need to create a new Scene-Action, followed by a new Hotspot-Action. There are 2 tabs named “Actions” within the editor. The tab at the top is for the whole selected scene, while the other tabs at the bottom of the screen are for each separated object (layer) within the scene.
The Scene-Actions become the conditions (“triggers”) that enable the main scripts to run. They can be as simple as the following examples:
It's like the beginning of a predefined sentence. The second part of this sentence (explained below) will allow to replace the "do..." part. It informs the engine exactly when to start all the other Actions in the scene.
When this has been defined, you can begin to enter Hotspot-Actions, or the second part of the sentence. There is a very long list of these, separated into different categories (character actions, scene actions, audio, video, interface, etc…). For example:
As a result, when you read the 2 Actions together, it creates a logical sentence:
e.g. [1] At the beginning of the scene, [2] display narration text: “Congratulations!”.
Puzzle development
Now that we’re becoming familiar with the system of Scenes and Actions, we can begin to develop the puzzle. The main idea for this scene is to switch on or off the 8 buttons, in order to create the correct combination. Each button has been set with a Variable (called a Condition), which is set either to True or to False. At the beginning of the scene, the Condition for each of the 8 buttons is set to True. In the following picture, you can see that the first switch is selected. As long as the condition “button1” is true, the switch is down.
The Scene-Actions become the conditions (“triggers”) that enable the main scripts to run. They can be as simple as the following examples:
- on left click, do…
- on right click, do…
- when mouse enters action area, do…
- at the beginning of the scene, do…
It's like the beginning of a predefined sentence. The second part of this sentence (explained below) will allow to replace the "do..." part. It informs the engine exactly when to start all the other Actions in the scene.
When this has been defined, you can begin to enter Hotspot-Actions, or the second part of the sentence. There is a very long list of these, separated into different categories (character actions, scene actions, audio, video, interface, etc…). For example:
- place character at position (x, y)
- show/hide scene named…
- fade to scene named…
- play sound “file.wav”
- display narration text “I’m happy, are you?”
- show/hide cursor
- if... else…
As a result, when you read the 2 Actions together, it creates a logical sentence:
e.g. [1] At the beginning of the scene, [2] display narration text: “Congratulations!”.
Puzzle development
Now that we’re becoming familiar with the system of Scenes and Actions, we can begin to develop the puzzle. The main idea for this scene is to switch on or off the 8 buttons, in order to create the correct combination. Each button has been set with a Variable (called a Condition), which is set either to True or to False. At the beginning of the scene, the Condition for each of the 8 buttons is set to True. In the following picture, you can see that the first switch is selected. As long as the condition “button1” is true, the switch is down.
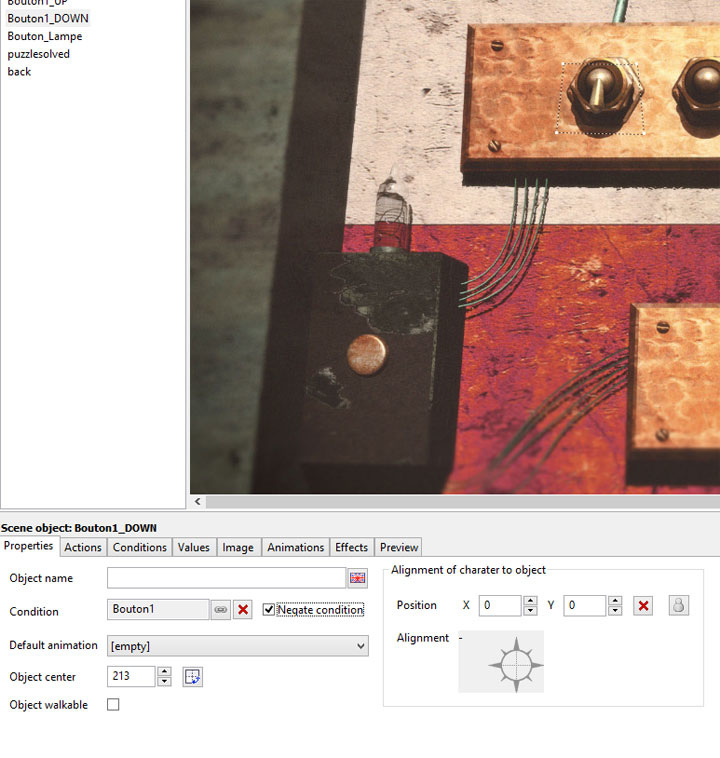
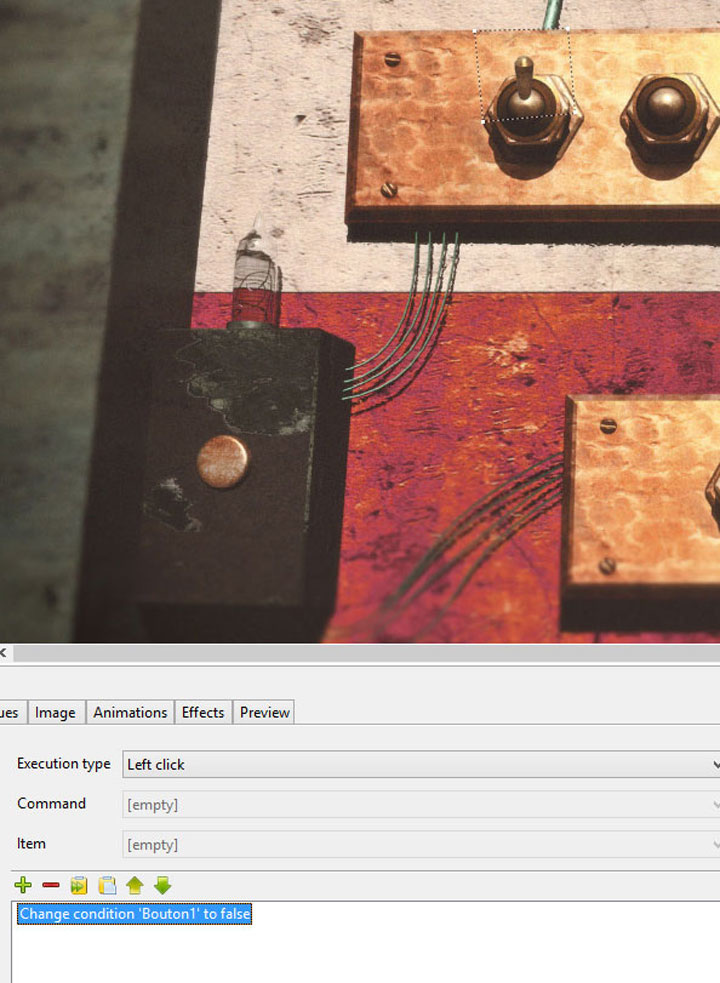
If the player clicks on a switch that is down, the current picture of the switch must disappear and then show the “up” switch button instead: so the condition is then set to False. In Visionaire, this is translated as follows: on left click, Change condition “button1” to false.
Then we have to check the Conditions for all of the other buttons and see if the combination we expected is correct. This is done by clicking on the round button under the light bulb. If the result is correct, we turn on the light bulb.
So far, I have only done it for button1 (I first check a combination using 1 button for example, but in the end the puzzle needs to check all the 8 buttons).
So far, I have only done it for button1 (I first check a combination using 1 button for example, but in the end the puzzle needs to check all the 8 buttons).
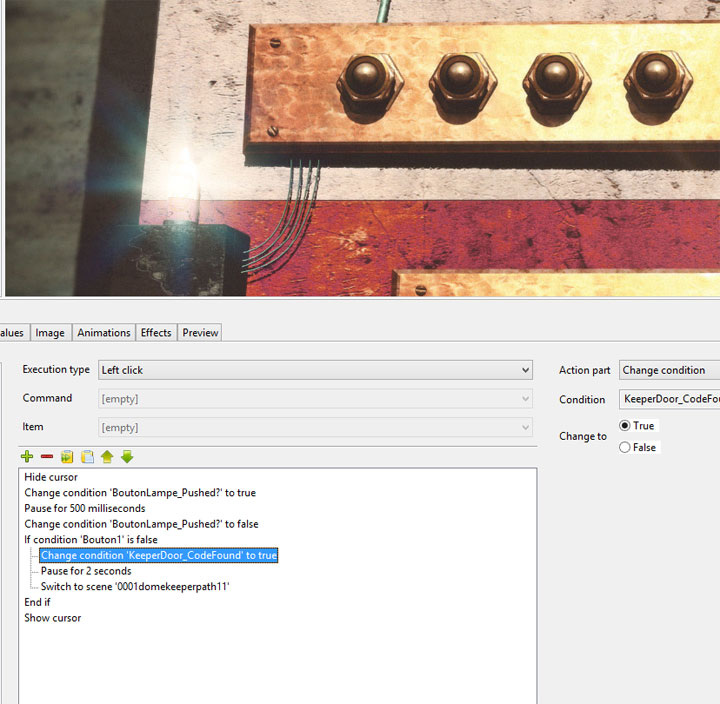
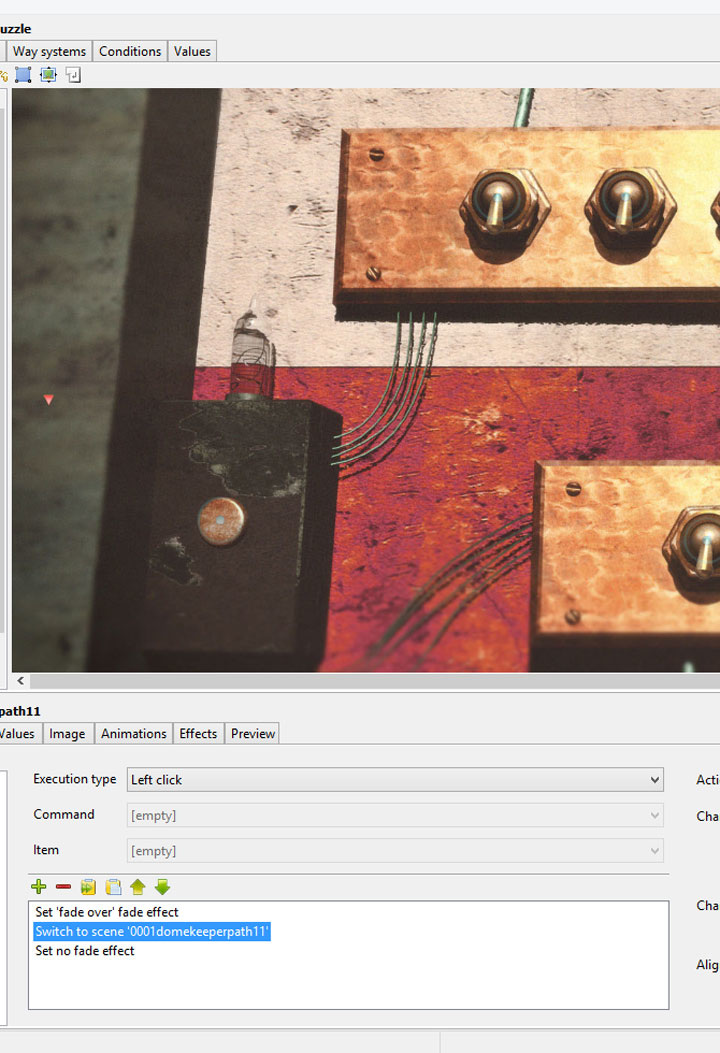
In the picture above, you can see the following list of Actions:
This can be translated as follows:
Long things short: the puzzle is solved and the door is opened.
I must also not forget to allow the possibility to return to the previous scene without solving the puzzle. This is done using the “red arrow” cursor showing on the left.
- Hide Cursor
- Change Condition “ButtonLamp_Pushed?” to true
- Pause for 500 ms
- Change Condition “ButtonLamp_Pushed?” to false
- If condition “button1” is false
- |___Change condition "KeeperDoor_CodeFound” to true
- |___Pause for 2 seconds
- |___Switch to scene “0001domekeeperpath11”
- End if
- Show Cursor
This can be translated as follows:
- Prevent the Player from clicking during the running of the script -> hide the mouse cursor
- Change the round button to simulate the fact that it was pressed
- Show it pressed for 500 milliseconds
- Hide the pressed button by resetting the condition
- Check if the button1 is up or down : if the combination is as expected,
- |___then the puzzle is solved and the light turns on (value KeeperDoor_CodeFound set to true).
- |___pause the game for 2 seconds (to give some time to see the light turned on)
- |___go back to the scene of the door, which will now be opened
- End of the "if" script (started at step 5)
- Show the cursor —> The player can click again and continue to play.
Long things short: the puzzle is solved and the door is opened.
I must also not forget to allow the possibility to return to the previous scene without solving the puzzle. This is done using the “red arrow” cursor showing on the left.
Animations and more
It is possible to go further in the development and add much more Actions. The puzzle illustrated here was easy to program, but sometimes there are a lot of Conditions and Variables that have to be checked.
It is often very difficult in Visionaire to optimize the list of scripts in order to save both memory and cpu-usage. Most of the time, you would work with quite a lot of “if…else…” actions together, so you cannot really reduce the number of Actions in your scene and make something more compact.
When you have finished your puzzle, you may want to add animations here and there, for a more dramatic result. What I did in the region of Kynan, is that I added an incessant rain effect. It is an animation of about 35 frames that runs in a permanent loop in front of your screen.
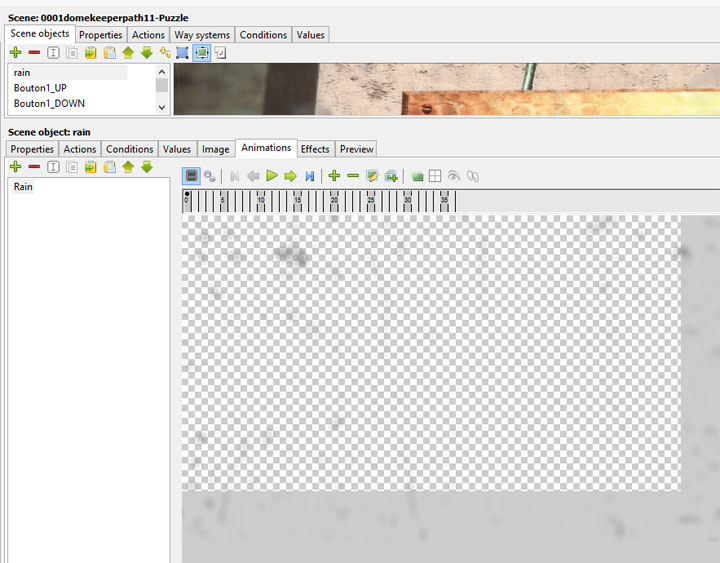
Can you see the dark raindrops in the lower right window of the above screen? They are blurred on purpose, because they flow on the surface of the glass of your helmet. It is a loopable animation, and as you can see in the picture, there is a timeline of 36 frames, that represent the total of pictures played during the game. By default, Visionaire will play this animation once, and probably not at the correct speed, so there is the possibility to change the settings as follows:
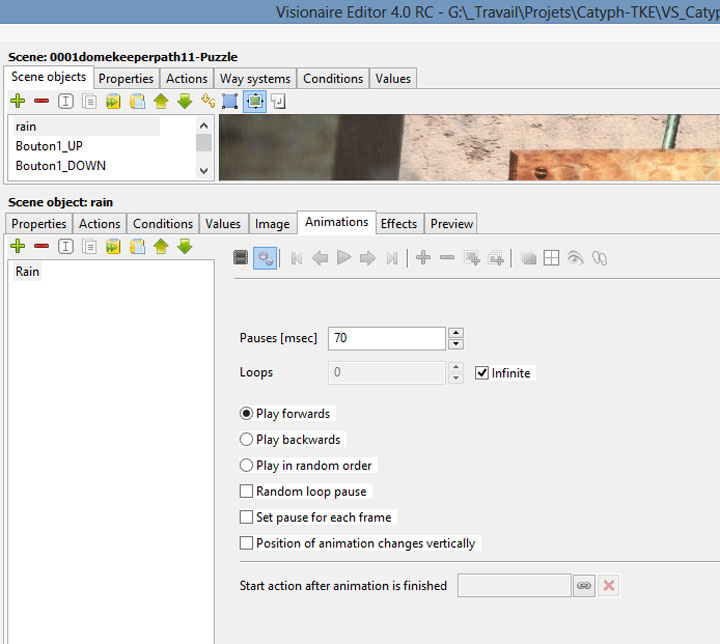
The most important options available are:
- the speed (the frame makes a pause for x milliseconds before the next one)
- the Infinite loop
- the possibility to play forward or backward.
LUA scripts
I will conclude with a short manual script developed in the LUA language, which corresponds to a different Action that was not listed by default in Visionaire.
First, let me explain the situation:
The Rain animation above was created at a resolution of 960 x 400 pixels. It is 50% smaller than the game resolution (1920 x 800). The reasoning was to save memory, because the rain is a PNG sequence with transparency, which can prove quite heavy in terms of resource usage. The full sequence of 36 frames would be saved/stored in RAM for as long as the rain loops onto your screen. To avoid problems on lower-level PC configurations/specs, I chose to reduce the rain resolution.
However, in order to fill the screen with the rain effect, we have to artificially double its size. Do you follow me? There is a simple LUA code that allows to scale an active animation, so I used it to scale the Rain.
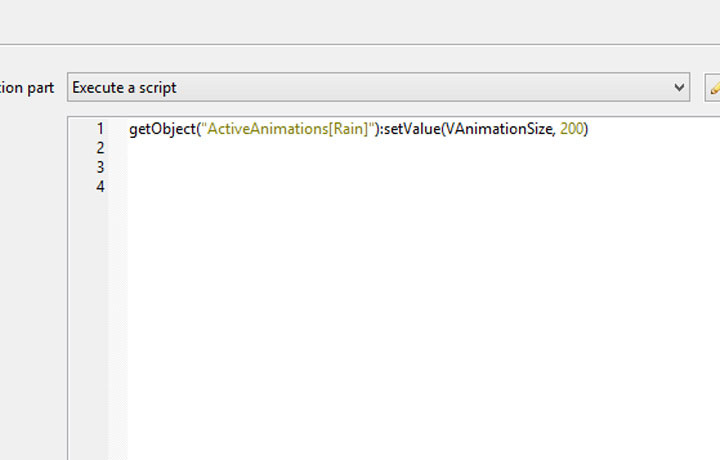
- getObject(“ActiveAnimations[Rain]”):setValue(VAnimationSize, 200)
This line will check within all the active animations in the game, for an animation named Rain. Then it will scale its size to 200%.
LUA is quite an easy code to understand, and is very useful to help in developing more advanced puzzles. Someone with good skills in programming will therefore have an infinite number of possibilities to create a game, even if an Action is not included within the editor!
Here's an example of playtime counter by Afrlme (VS team) that you can easily add in a project:
- local d, h, m, s -- empty variables which will be used to store converted time values
- --* function which converts seconds to dd:hh:mm:ss time format * --
- function secondsToTime(v)
- d = math.floor(v / 86400)
- h = math.floor(v % 86400 / 3600)
- m = math.floor(v % 3600 / 60)
- s = math.floor(v % 3600 % 60)
- if d < 10 then d = tostring("0" .. d) end
- if h < 10 then h = tostring("0" .. h) end
- if m < 10 then m = tostring("0" .. m) end
- if s < 10 then s = tostring("0" .. s) end
- return tostring( d .. ":" .. h .. ":" .. m .. ":" .. s )
- end
Can you understand how it works?
Anyway, as explained previously, knowing LUA is optional to create a game in Visionaire Studio. I usually use it to input keys during puzzles, count time, create minigames, increase the size of animations, play a random event, manage the autosave feature, or work with shaders...
Post-Production
Now we should review the Post-Production process stage of the development.
Once again, I would advise that the descriptions that I have chosen (Pre-Production, Production and Post-Production) are my own choice and might not be absolutely accurate. They’re here simply to allow me to separate the different phases of the development, and in order to make it easier to describe and for you to understand. “Post-production” encompasses the different stages following the making of a film and they normally come after the main stage of filming, for example, compositing and editing.
For the game Catyph, what I call Post-Production is slightly different and includes the following steps:
- proofreading
- localization
- music composition
- sound effects
- voices
- visual effects
- beta-testing
- bugs fixing
Localization
I will group “Proofreading” and “Localization” into the same step. While I would normally separate them when I work on them, they’re somehow related to each other, as you can probably imagine.
When I work on any game (ASA or Catyph), I always start work in my native language, French. You can probably appreciate that it’s much easier for me to create the story and write it in French. However, my problem with the French language is not only that most people won’t understand it when the game releases, it’s also that I am frequently working with people from all around the world who generally cannot help me if I only share French texts.
As a result, I not only work in French, but I also work in English. I have no choice but to work in 2 languages at the same time, so Catyph contains both French and English texts. The problem is: my English is not good enough to release the game! Even if I make a huge effort in checking my texts, there are inevitably different problems caused by either spelling or errors in grammar that I cannot improve on my own. This is why I currently have to work with another person who proofs my English texts for me (thank you again Roger!).
So, if you can follow me, there are already 3 steps within the process of localization:
To these 3 principal steps, you also need to add:
This is the end-result in the datalog when importing the texts in the game. Picture 1: empty datalog. Picture 2: text only with transparency. Picture 3: final datalog with text displayed.
Once again, I would advise that the descriptions that I have chosen (Pre-Production, Production and Post-Production) are my own choice and might not be absolutely accurate. They’re here simply to allow me to separate the different phases of the development, and in order to make it easier to describe and for you to understand. “Post-production” encompasses the different stages following the making of a film and they normally come after the main stage of filming, for example, compositing and editing.
For the game Catyph, what I call Post-Production is slightly different and includes the following steps:
- proofreading
- localization
- music composition
- sound effects
- voices
- visual effects
- beta-testing
- bugs fixing
Localization
I will group “Proofreading” and “Localization” into the same step. While I would normally separate them when I work on them, they’re somehow related to each other, as you can probably imagine.
When I work on any game (ASA or Catyph), I always start work in my native language, French. You can probably appreciate that it’s much easier for me to create the story and write it in French. However, my problem with the French language is not only that most people won’t understand it when the game releases, it’s also that I am frequently working with people from all around the world who generally cannot help me if I only share French texts.
As a result, I not only work in French, but I also work in English. I have no choice but to work in 2 languages at the same time, so Catyph contains both French and English texts. The problem is: my English is not good enough to release the game! Even if I make a huge effort in checking my texts, there are inevitably different problems caused by either spelling or errors in grammar that I cannot improve on my own. This is why I currently have to work with another person who proofs my English texts for me (thank you again Roger!).
So, if you can follow me, there are already 3 steps within the process of localization:
- writing the texts in my native language (French)
- translating the text into my own English (or looking for a person to translate, but this is both complicated and also usually expensive)
- asking someone I trust in to proof my English texts.
To these 3 principal steps, you also need to add:
- looking for other people to translate from English/French to x (Spanish, Italian, German…)
- importing all the translations into the game
This is the end-result in the datalog when importing the texts in the game. Picture 1: empty datalog. Picture 2: text only with transparency. Picture 3: final datalog with text displayed.


It may not, at first, appear to be the case but this process takes a significant amount of efforts. Initially writing the texts in French, in order to make them interesting, logical and correct, is on its own a significant enough job. Then having to translate everything into English is massively time-consuming. The datalog within the game (a kind of diary) is composed of tens of pages full of different information which has to be both accurate and, in addition, shouldn’t be contradictory with any other parts of the game.
If you were to ask me, I would say that the datalog is by far the most difficult part to write, and it takes the longest time as well. All of the translations have to be copied/pasted into pictures (PNG with alpha) in order to be able to appear in the game.
But there are also other elements of the game that can be tricky. The in-game dialogues (cut-scenes or AI narration) are more interesting to write while you are developing the game, but actually require significantly more attention during the translation process…
Voice acting
Adding nice voicing to the game when you work on your own and have little or no funds is a nightmare. You may have all the goodwill of the world, but if you cannot use your own voice (either because you don’t speak English very well, or because your voice just doesn't fit – my case!) then voicing the animated sequences of your game becomes a gigantic problem.
Happily, it appears that a lucky star decided to help me, as I managed to get in touch with some different voice actors (Jared, Klemens and Steven) who all agreed to help the project in their free time. There is no way for me to say how grateful I am, and it makes me even happier that they did it for fun. You may not realize at first why it was so very lucky to have these actors. An easy way to explain this, in order for you to be able to easily understand, is to ask you to put yourself in my situation: you have a video game where you need 3 different voices to read quite a lot of replicas. You have no funds (but a lot of passion of course) and you need 3 actors. How would you proceed?
- try to record your own voice and modify it with an audio editor
- proceed as in 1, but using friends voices
- seek for amateur actors on the net and get in touch with them
- seek for professional actors and ask if they agree to help in their free time
- find funds
Honestly I am now very happy to have the support of voice actors for Catyph, and I mostly proceeded using trial and error before I was in a position where I could get in touch with them. Thanks to previous contacts in the US and UK I found the help of the 3 actors I named previously. And that’s exactly why I said I was very fortunate to have their support! In the end, when making an indie game, most of the solutions come from friends of friends of friends. You know how it works, don’t you?
So here is the current list of actors for Catyph:
- Character of General Lantier / voiced by Jared Murphy.
- Character of Germinal / voiced by Klemens Koering.
- (Secret character) / voiced by Steven Tidwell.
- The AI, M.A.I.D.EN / synthesized voice, Microsoft Zira.
All of the recordings are based on the previously written texts. It is vital that the texts are finalised, proofed and that they won’t change!
Original Soundtrack
This time I would like to talk about the music in Catyph. This is a bit difficult because it is not publicly released at this time, so I cannot share many examples. I will explain the work of the musicians by referring to our previous collaboration: ASA: A Space Adventure.
The OST of Catyph will be composed of somewhere in the region of 20 tracks (approximately). It is roughly the same number of tracks that Karreo did for ASA: A Space Adventure. In fact, we followed the same process of creation: using the main themes from the initial short film as a starting point for the game.
You can listen to the ASA OST (free streaming) here:
Karreo is a Soundtrack Producer. You can visit www.karreo.com for more information regarding their society. They work on video clips for their own musicians, which is a good way to support everyone within their collective. Making music for games is not their main purpose and they generally prefer animation and films.
The creation process of the soundtrack of Catyph is difficult because Karreo works at the same time as I am creating the graphics. It means that they don’t exactly know what the environments will look like when they work on the music. I had almost no images to share with them at the time they began to work: the graphics of Catyph didn’t exist at all in 3D! So I had to create a precise brief document, including reference pictures found here and there from the web. The idea was to use these pictures to describe the characteristics of each region of Catyph. Of course, these pictures were accompanied by a descriptive text.
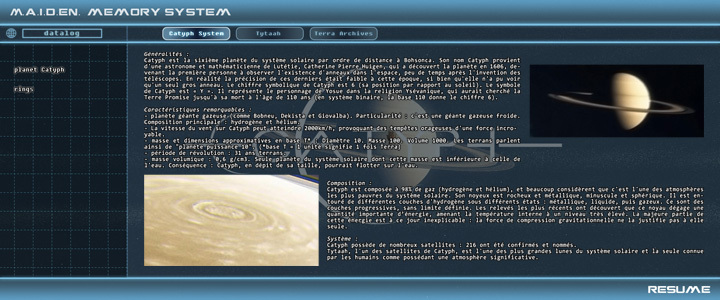
For example, the region of Saad:
The description I shared was quite simple: if you remember from the previous screenshots that were shared here and online before, Saad is a place of red sand where a crater was made by a meteorite long ago. In this crater, some alien plants have grown and a part of the area is covered with a small forest.
But this picture was not available to Karreo, so they didn’t see it when they were working on the music. Instead, I specified some keywords, such as : desert, forest, meteorite, alien… etc!
The reference pictures I had attached were from various sources, and the most representative example might be the forest in the movie Avatar. This forest is very different from the above picture of Saad! Karreo used the pictures as a source of inspiration, but in the end, they had to imagine everything by themselves. It is the same method that we had already used to work on ASA. If you played ASA and remember Planet Forte, you will easily understand the keywords I gave to Karreo at the time: rock, turquoise sea, paradise islands, blue, water…
It would seem that it was an interesting process for the main composer of the ASA OST at Karreo (Stélian Derenne), who had enough freedom to create the tracks of his choice. There were not many restrictions, so they could focus on their own ideas, with no fear about making “bad” music that wouldn’t fit with the game. I feel that it resulted in a good balance overall within the OST. It is important to remember that the whole ASA OST was also strongly inspired by the soundtrack of the original short film 2011: A Space Adventure. We have been following the same process with Catyph, and you can listen to the Catyph short film OST, here:
It already gives a good impression of the future OST! The track Mind the Mines was particularly enjoyable, and will probably become the Theme played in the Menus in the game. Finally, the best idea is probably just to listen to Stélian Derenne, and let him explain his feelings after he worked on ASA:
<< I was lucky enough to surf on the relative success of the short film preceding the game, so I took back the introduction scene’s theme and tried to flavour it to the various environments the player would be going through, most of the time wondering on the spot what I’d play on my iPod.
Composing it felt more and more like a casual movie soundtrack thanks to the many graphic materials that were provided, keeping it easy on the ear in most parts, dynamic in others, and even experimental in some cases…
This was my first complete video game soundtrack, and it was made fun thanks to the freedom I had.
What worried me while making it was how to keep the balance between the lively and dramatic touch I believe any composition of this kind should have, and how to avoid having the game-player just turning the music off out of boredom.
I actually enjoyed not knowing that much about ASA, I was able to just enjoy discovering it totally once I got to play the full version! >>
Stélian Derenne - Karreo
Thanks for reading
It is the end of this Making Of, which is probably long enough. Of course it could be even more detailed and could contain much more information (graphics, sound effects, personal feelings...) but I now prefer to focus on the development itself, in order to release the game in the best conditions in the beginning of 2016. Catyph is my biggest creation at that time, it took me 2 years to produce and a very lot of efforts and troubles. I am proud of the result and I can't wait to show you. As soon as possible, I will give more details in a Post Mortem article, just like I did with ASA. In the meantime, thank you very much for reading this page. Please feel free to get in touch if you have questions, and I really, really hope that you will have a nice time playing the game.